How to download the collected evidence and artifacts?
Introduction
Section titled “Introduction ”AIR provides two separate mechanisms for storing collected evidence, artifacts, and data. The first and default method is to use the local storage of the asset and the server machines’ file system. The second method utilizes remote network services, which we refer to as Evidence Repositories, including SFTP, FTPS, SMB, Amazon S3 Buckets, Azure Blob Storage, and Google Cloud Storage.
The location of the evidence and artifacts storage is defined in the Policy section of the AIR Console. Since the Acquisition tasks are directly bound to these policies, investigators and analysts can change the type (Local or Evidence Repository) and path of the collected evidence and artifacts by using the options fields in the Policy screen.
The exact location and path of the evidence and artifacts can be viewed through the Evidence URL value, which is located under the Metadata page that is accessible via a button shown under the Status of the associated Task.
The evidence and artifacts collection and storage flow is summarized as follows.
- An Acquisition Task is created on the AIR Console.
- The AIR responder installed on asset machines connects to the AIR Console to retrieve the task and task details.
- The AIR responder installed on asset machines runs the Acquire Task on the asset, collecting evidence and artifacts.
- AIR responder stores the collected evidence and artifacts according to the configuration options defined in the Policies section.
-
If the Local option is selected, the collected evidence and artifacts will be stored in the file system location defined in the configuration options.
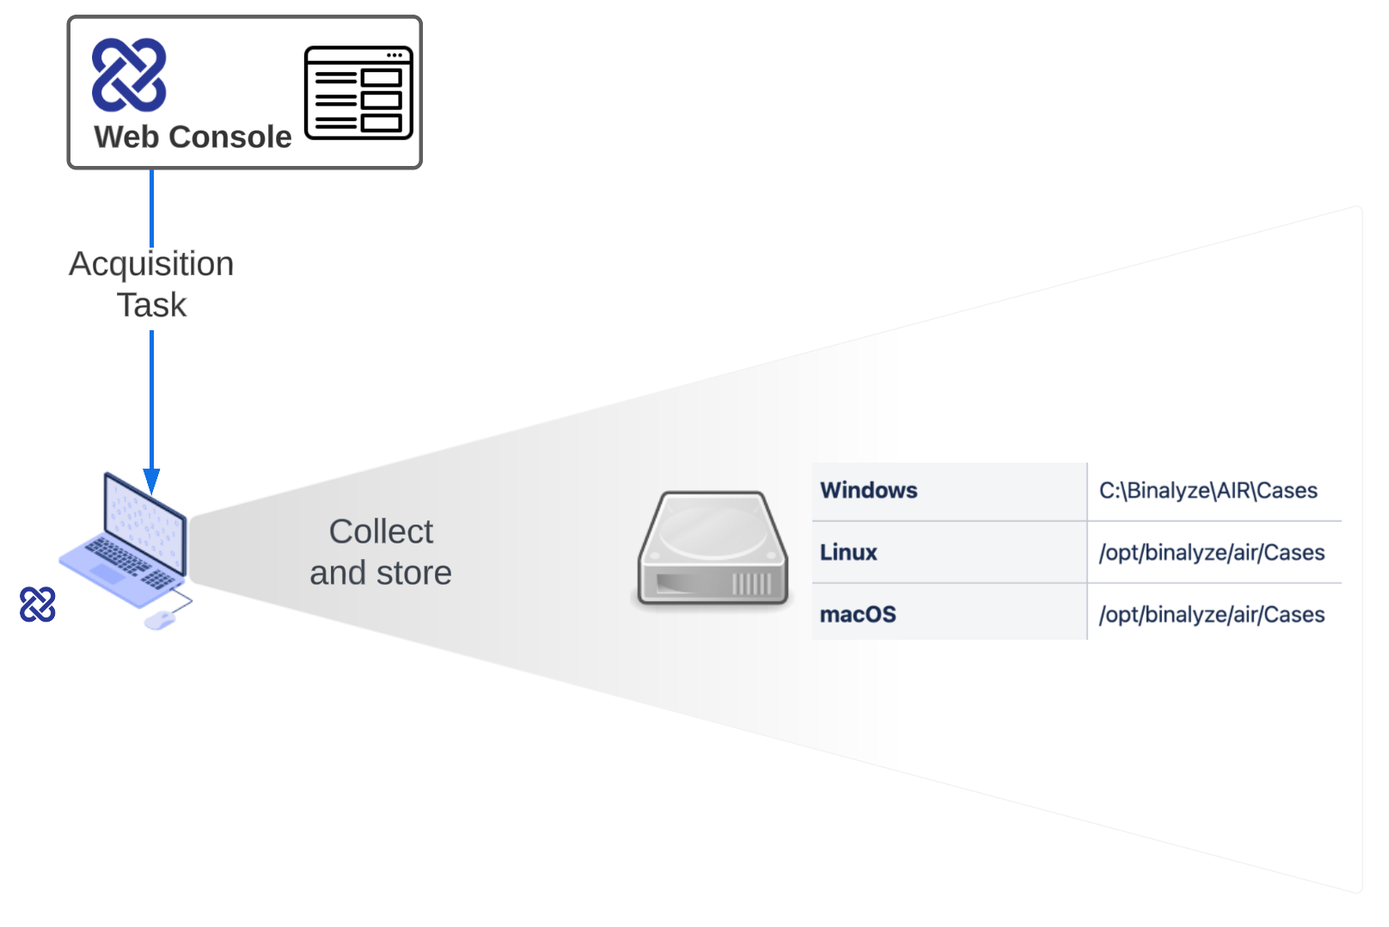
How to download the collected evidence and artifacts: Fig1
-
If the Evidence Repository option is selected, the collected evidence and artifacts will be stored in a temporary location on the local file system. Then, the asset machine directly connects to the remote network service/server and uploads the evidence and artifacts to the location defined in the configuration options. All the evidence and artifacts will be deleted from the asset. The flow is depicted in the picture below.
-
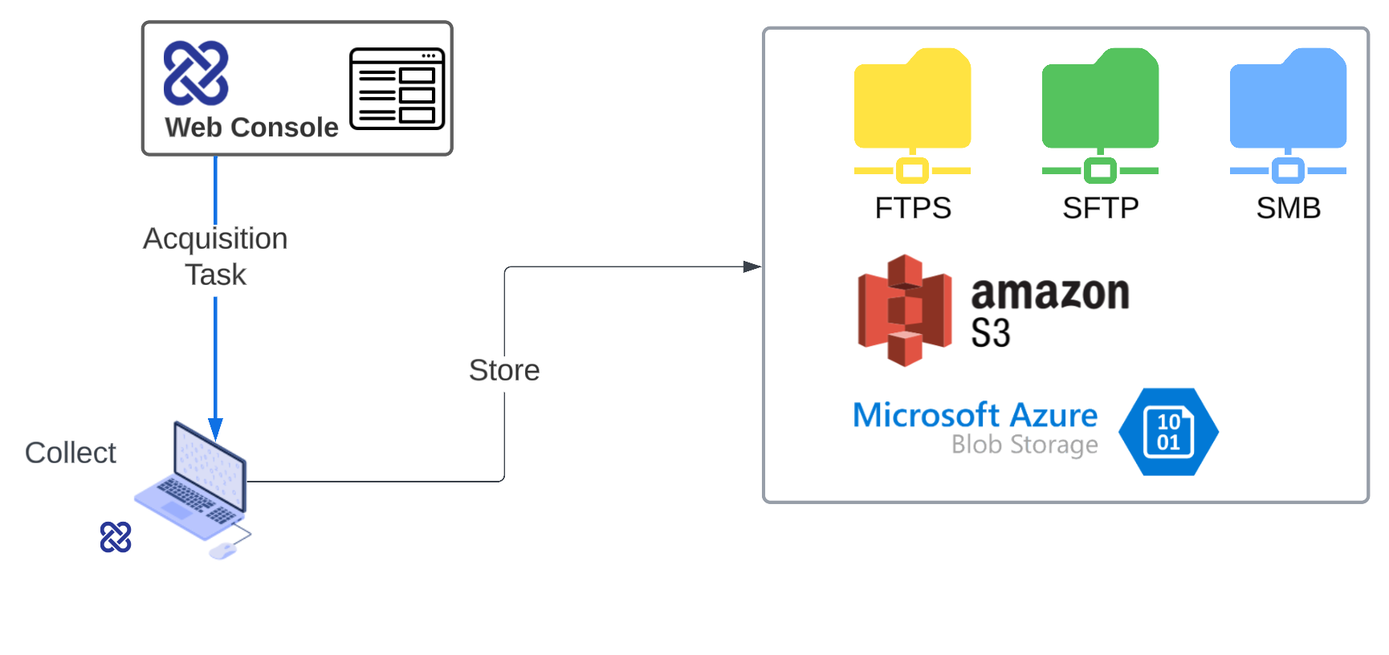
How to download the collected evidence and artifacts: Fig2
Download The Evidence and Artifacts from Local Storage
Section titled “Download The Evidence and Artifacts from Local Storage ”Two separate methods can be used to download collected evidence and artifacts, which are stored in the local file system of the asset machines. Investigators and analysts can use AIR built-in remote management tool, interACT, or their favorite remote management tool to connect and download the requested evidence and artifacts.
The default location of all collected evidence and artifacts are listed below according to the operating systems. The default location can be changed by editing the policies.
| Windows | C:\Binalyze\AIR\Cases |
|---|---|
| Linux | /opt/binalyze/air/Cases |
| macOS | /opt/binalyze/air/Cases |
Using interACT
Section titled “Using interACT ”- Find the task of interest.
The relevant task can be viewed either by navigating through the Global Tasks Tab or by selecting the associated assets from the asset listings and then locating the related task under the asset details page. - Locate the exact path of the evidence and artifacts that require downloading.
Click the Metadata button under this Status on the page and view the value of the Evidence URL. It is also possible to directly copy the value of the Evidence URL by clicking the copy button, which is located at the beginning of the Evidence URL line. - Connect to the machine using interACT by clicking the interACT button, located under the asset details page.
- Navigate to the path provided with the Evidence URL by using the cd command.
- Download the associated file by using the get command provided by the interACT.
By Using Remote Management tools
Section titled “By Using Remote Management tools ”- Find the task of interest.
The relevant task can be viewed either by navigating through the Global Tasks Tab or by selecting the associated assets from the asset listings and then locating the related task under the asset details page. - Locate the exact path of the evidence and artifacts that require downloading.
Click the Metadata button under this Status on the page and view the value of the Evidence URL. It is also possible to directly copy the value of the Evidence URL by clicking the copy button, which is located at the beginning of the Evidence URL line. - Connect to the asset with your favorite remote management tool. This tool may vary depending on the operating system installed on the asset. The most commonly used tools include SSH, Remote Desktop Manager, and VNC, among others.
- Navigate to the path provided with the Evidence URL by using the cd command.
- Download the associated file by using the commands and activities provided by the remote management tool.
Download The Evidence and Artifacts from Evidence Repositories
Section titled “Download The Evidence and Artifacts from Evidence Repositories ”- Find the task of interest.
The relevant task can be viewed either by navigating through the Global Tasks Tab or by selecting the associated assets from the asset listings and then locating the related task under the asset details page. - Download the compressed/encrypted zip file by clicking the Evidence URL
The downloadable link will be created and bonded directly to the Evidence URL. Click the Metadata button under this Status on the page, and then click on the Evidence URL to download the zip file, which includes the chosen evidence and artifacts.