Cloud Forensics
Investigators and analysts can use the AIR platform to conduct investigations on machines located in cloud platforms. Our platform supports cloud-based virtual machines, as well as on-premise and off-network devices. Investigators and analysts can install responders on virtual machines located on the cloud infrastructure for investigations and analysis. Amazon Web Services, Microsoft Azure, and Google Cloud Platform are all supported.
We understand the unique challenges of investigating cloud-based attacks, such as Business Email Compromise (BEC). That’s why we have introduced the Tornado preview version, a standalone desktop application designed to simplify evidence collection from Google Workspace and Microsoft Office 365. Learn all about Tornado here.
Investigators and analysts can easily and quickly deploy responders to their cloud assets and immediately initiate investigations, compromise assessments, and threat-hunting activities. By leveraging the automation advantages of cloud platforms, users can easily deploy multiple responders using a single authorized cloud platform account.
After adding the authorized account to the Console, it enumerates the cloud platform to discover and list assets. Then, investigators and analysts can deploy responders to individual or multiple cloud assets with one click.
Add Authorized User
Section titled “Add Authorized User ”Since different cloud platforms utilize distinct identity and access management infrastructures and employ different working mechanisms, their requirements may vary; however, ultimately, all we need is an authorized account with list and control permissions on cloud assets.
Investigators and analysts can add a cloud account to the Console using one of two methods:
Method 1: From the Devices section
- From the Main Menu, select Assets, then select Devices from the Secondary Menu
- Click + Add New and select Cloud Account
- Click the Add Account button for the cloud platform you want to add
Method 2: From the Cloud section
- From the Main Menu, select Assets, then select Cloud from the Secondary Menu
- Click + Add New (or Add your first Cloud Account if no accounts exist)
- Click the Add Account button for the cloud platform you want to add
The configurations that need to be performed according to the cloud platforms are listed below.
Amazon Web Services Compute EC2
Section titled “Amazon Web Services Compute EC2 ”Either of the two methods mentioned above will redirect investigators and analysts to similar pages, allowing them to enter their account details. They can either enter their existing account details, which are given below, or use the cloud formation link provided by AIR to create a new account with enough permissions.
The cloud account needs permissions to deploy the virtual machine AIR responder. Instead of attaching multiple AWS managed policies (for example AmazonEC2ReadOnlyAccess, CloudWatchAgentServerPolicy, AmazonSSMManagedInstanceCore, AmazonSSMDirectoryServiceAccess, AmazonSSMMaintenanceWindowRole, AmazonSSMReadOnlyAccess, or ad-hoc actions such as ssm:CancelCommand), create a custom IAM policy that contains only the minimum actions required, as shown below.
{ "Version": "2012-10-17", "Statement": [ { "Sid": "BinalyzeAIR", "Effect": "Allow", "Action": [ "ec2:DescribeRegions", "ec2:DescribeInstances", "ssm:DescribeInstanceInformation", "ssm:SendCommand", "ssm:GetCommandInvocation", "ssm:CancelCommand" ], "Resource": "*" } ]}The creation of an AWS Account with sufficient permissions flow is explained below.
- Click on the URL and Create an Account
- Open AWS Console -> IAM -> Users
- Select the User -> Security Credentials -> Create Access Key
- Fill out the Account Details Form
Microsoft Azure Virtual Machines
Section titled “Microsoft Azure Virtual Machines ”Either two different ways mentioned above will redirect investigators and analysts to similar pages allowing them to enter account details. They can either enter their existing account details, which are given below or create a new account with enough permissions.
Cloud accounts need the following permissions to deploy the virtual machine responder.
The creation of an Azure Account with sufficient permissions flow is explained below.
- Azure portal -> App Registrations -> New Registration
- Assign required roles to the new app registration for the subscription
- App Registrations -> Open the created App Registration
- Certificates & Secrets -> Create a new client secret
- Fill out the Account Details Form
Google Cloud Platform
Section titled “Google Cloud Platform ”GCP integration enables investigators and analysts to discover, synchronize, and deploy responders to Google Compute Engine VM instances. The integration uses GCP service accounts for authentication and requires a Google Cloud Storage (GCS) bucket for deployment scripts.
Adding a GCP Account
Section titled “Adding a GCP Account”Navigate to Integrations → Google Cloud Platform → Add Account, or from Assets → Cloud Devices → Google Cloud Platform → Add Account.
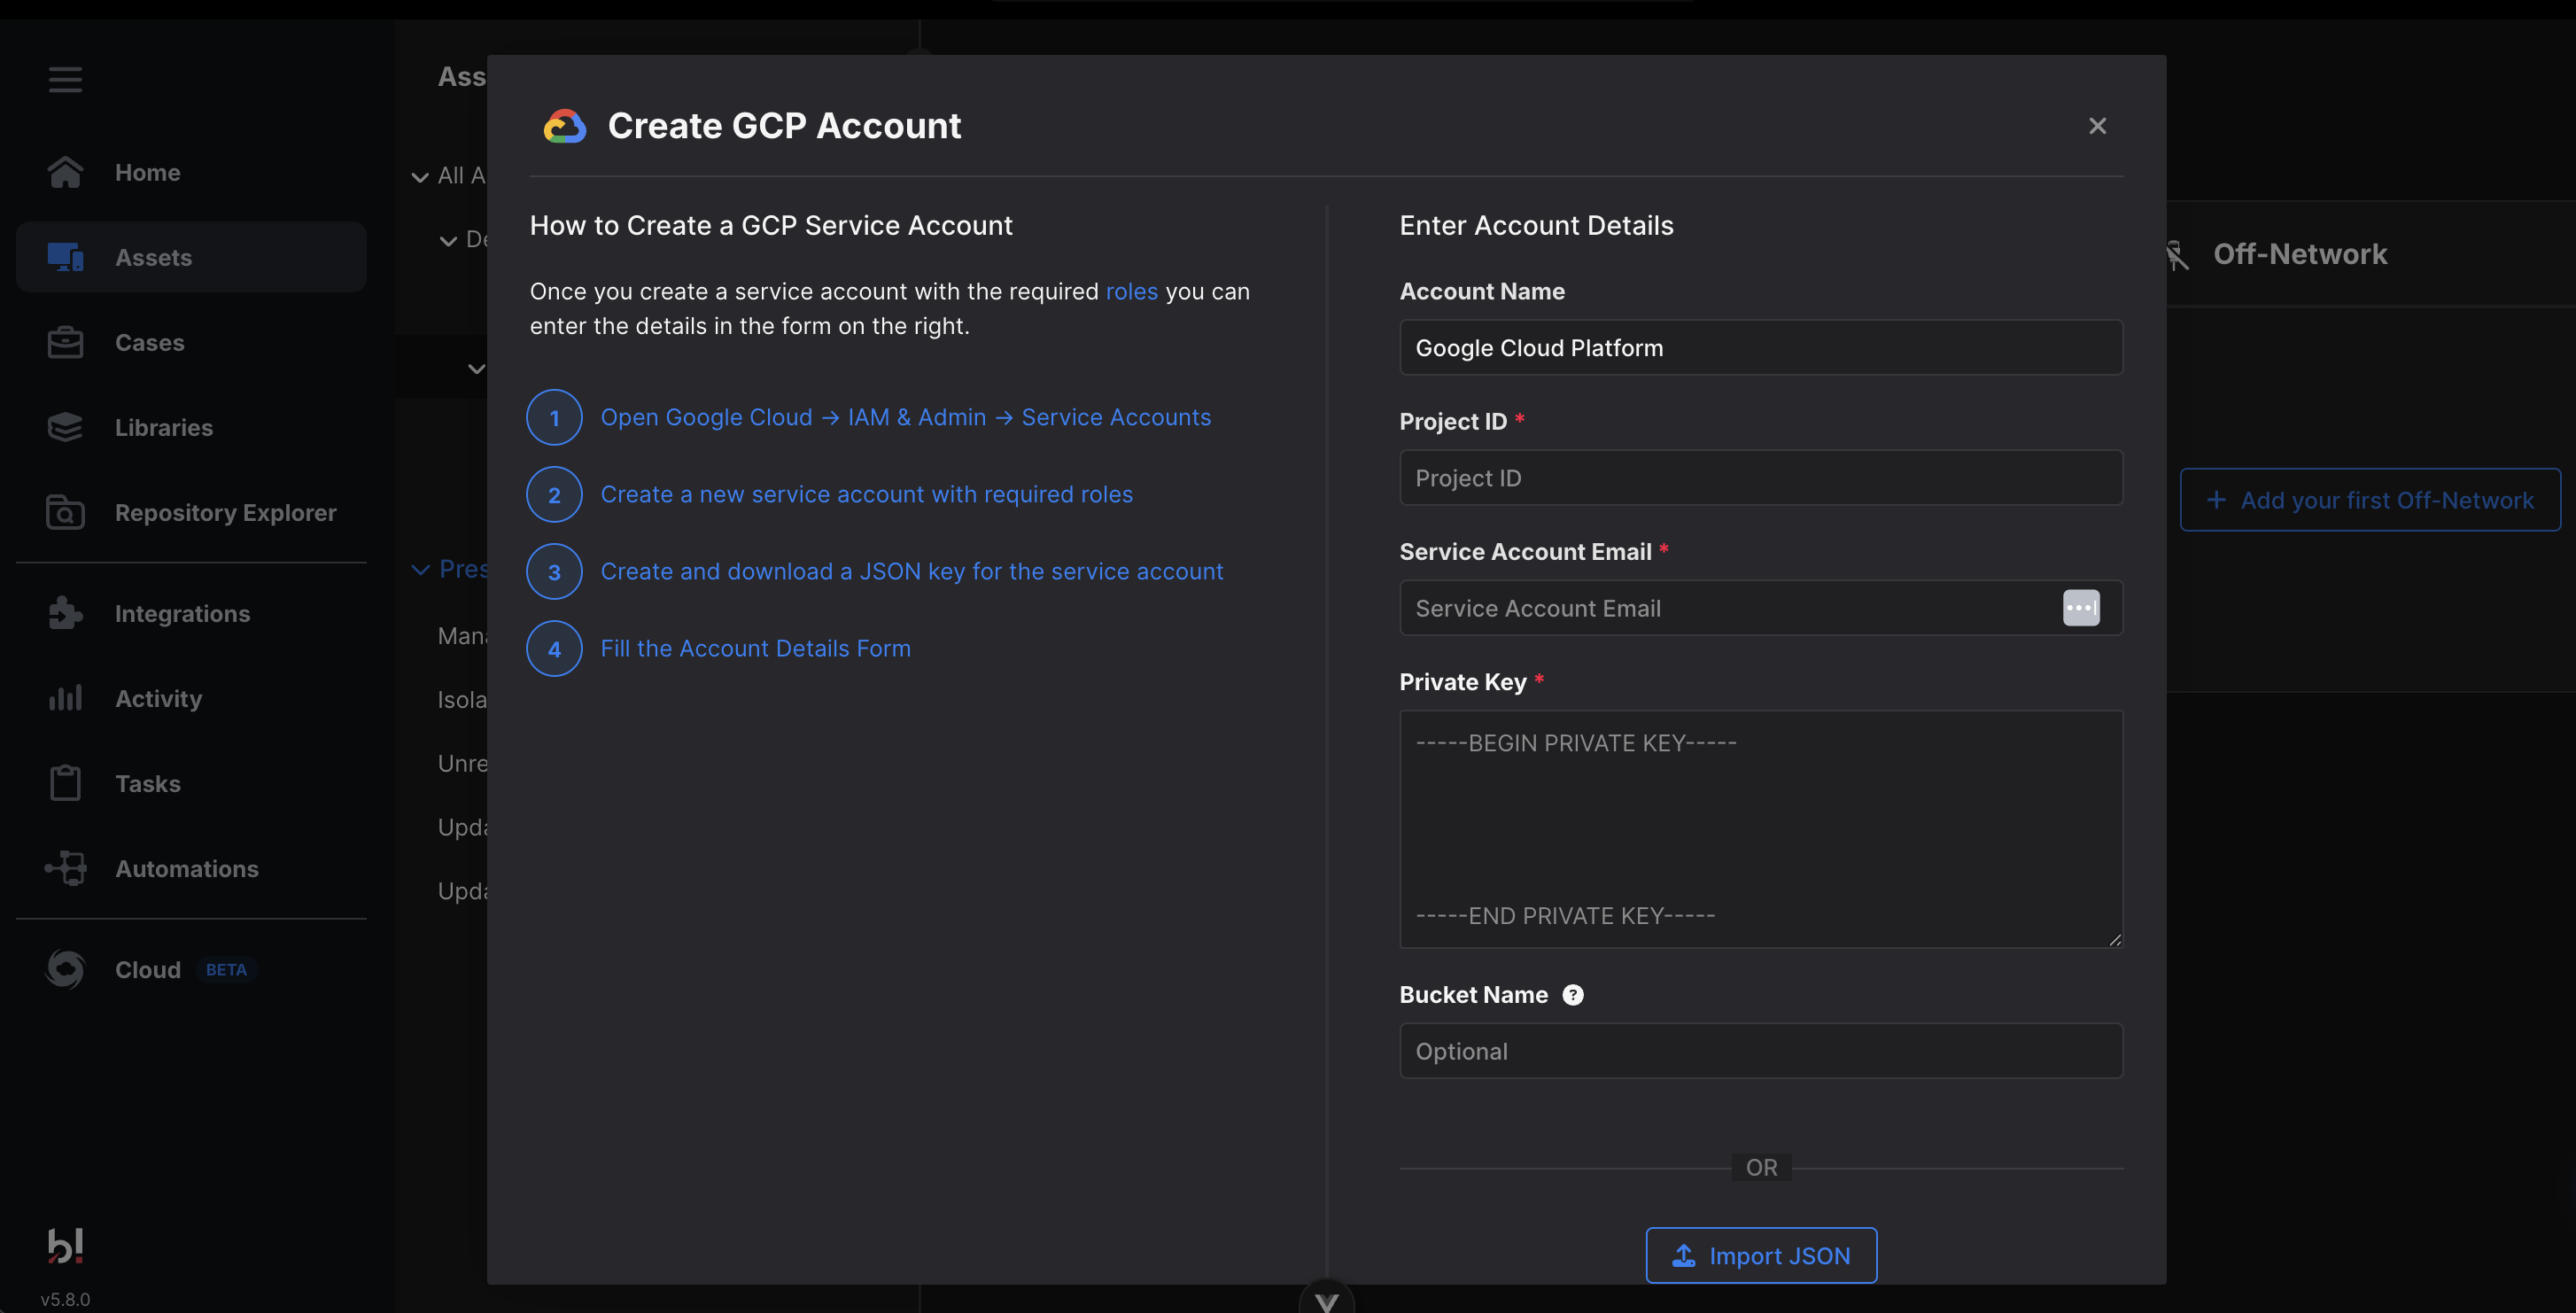
Cloud Forensics: Adding a GCP Account
You can enter credentials manually or use Import JSON to upload the service account key file downloaded from GCP.
Creating a Service Account in GCP
Section titled “Creating a Service Account in GCP”- In the GCP Console, navigate to ☰ → IAM & Admin → Service Accounts
- Click Create Service Account
- Assign the following IAM roles:
- After creating the service account, go to Keys → Add Key → Create new key → Select JSON
- The key file downloads automatically — use this to import credentials into AIR
Required GCP APIs
Section titled “Required GCP APIs”Ensure the following APIs are enabled in your GCP project:
| API | Purpose |
|---|---|
| Compute Engine API | Listing and reading VM instances |
| OS Config API | Creating and monitoring patch jobs for deployment |
| Cloud Storage API | Storing deployment scripts |
| Cloud Logging API | Reading deployment logs and status |
| Cloud Resource Manager API | Verifying credentials and project access |
Why a GCS Bucket is Required
Section titled “Why a GCS Bucket is Required”Unlike AWS (SSM Run Command) and Azure (Run Command), GCP does not have a direct command execution API. Instead, GCP uses the OS Config Agent and Patch Job mechanism:
- The deployment script is uploaded to your GCS bucket
- A Patch Job is created via the OS Config API
- The OS Config Agent on the VM downloads and executes the script
- Results are written to Cloud Logging
If you attempt to deploy a Responder without configuring a bucket, you will see the following warning:
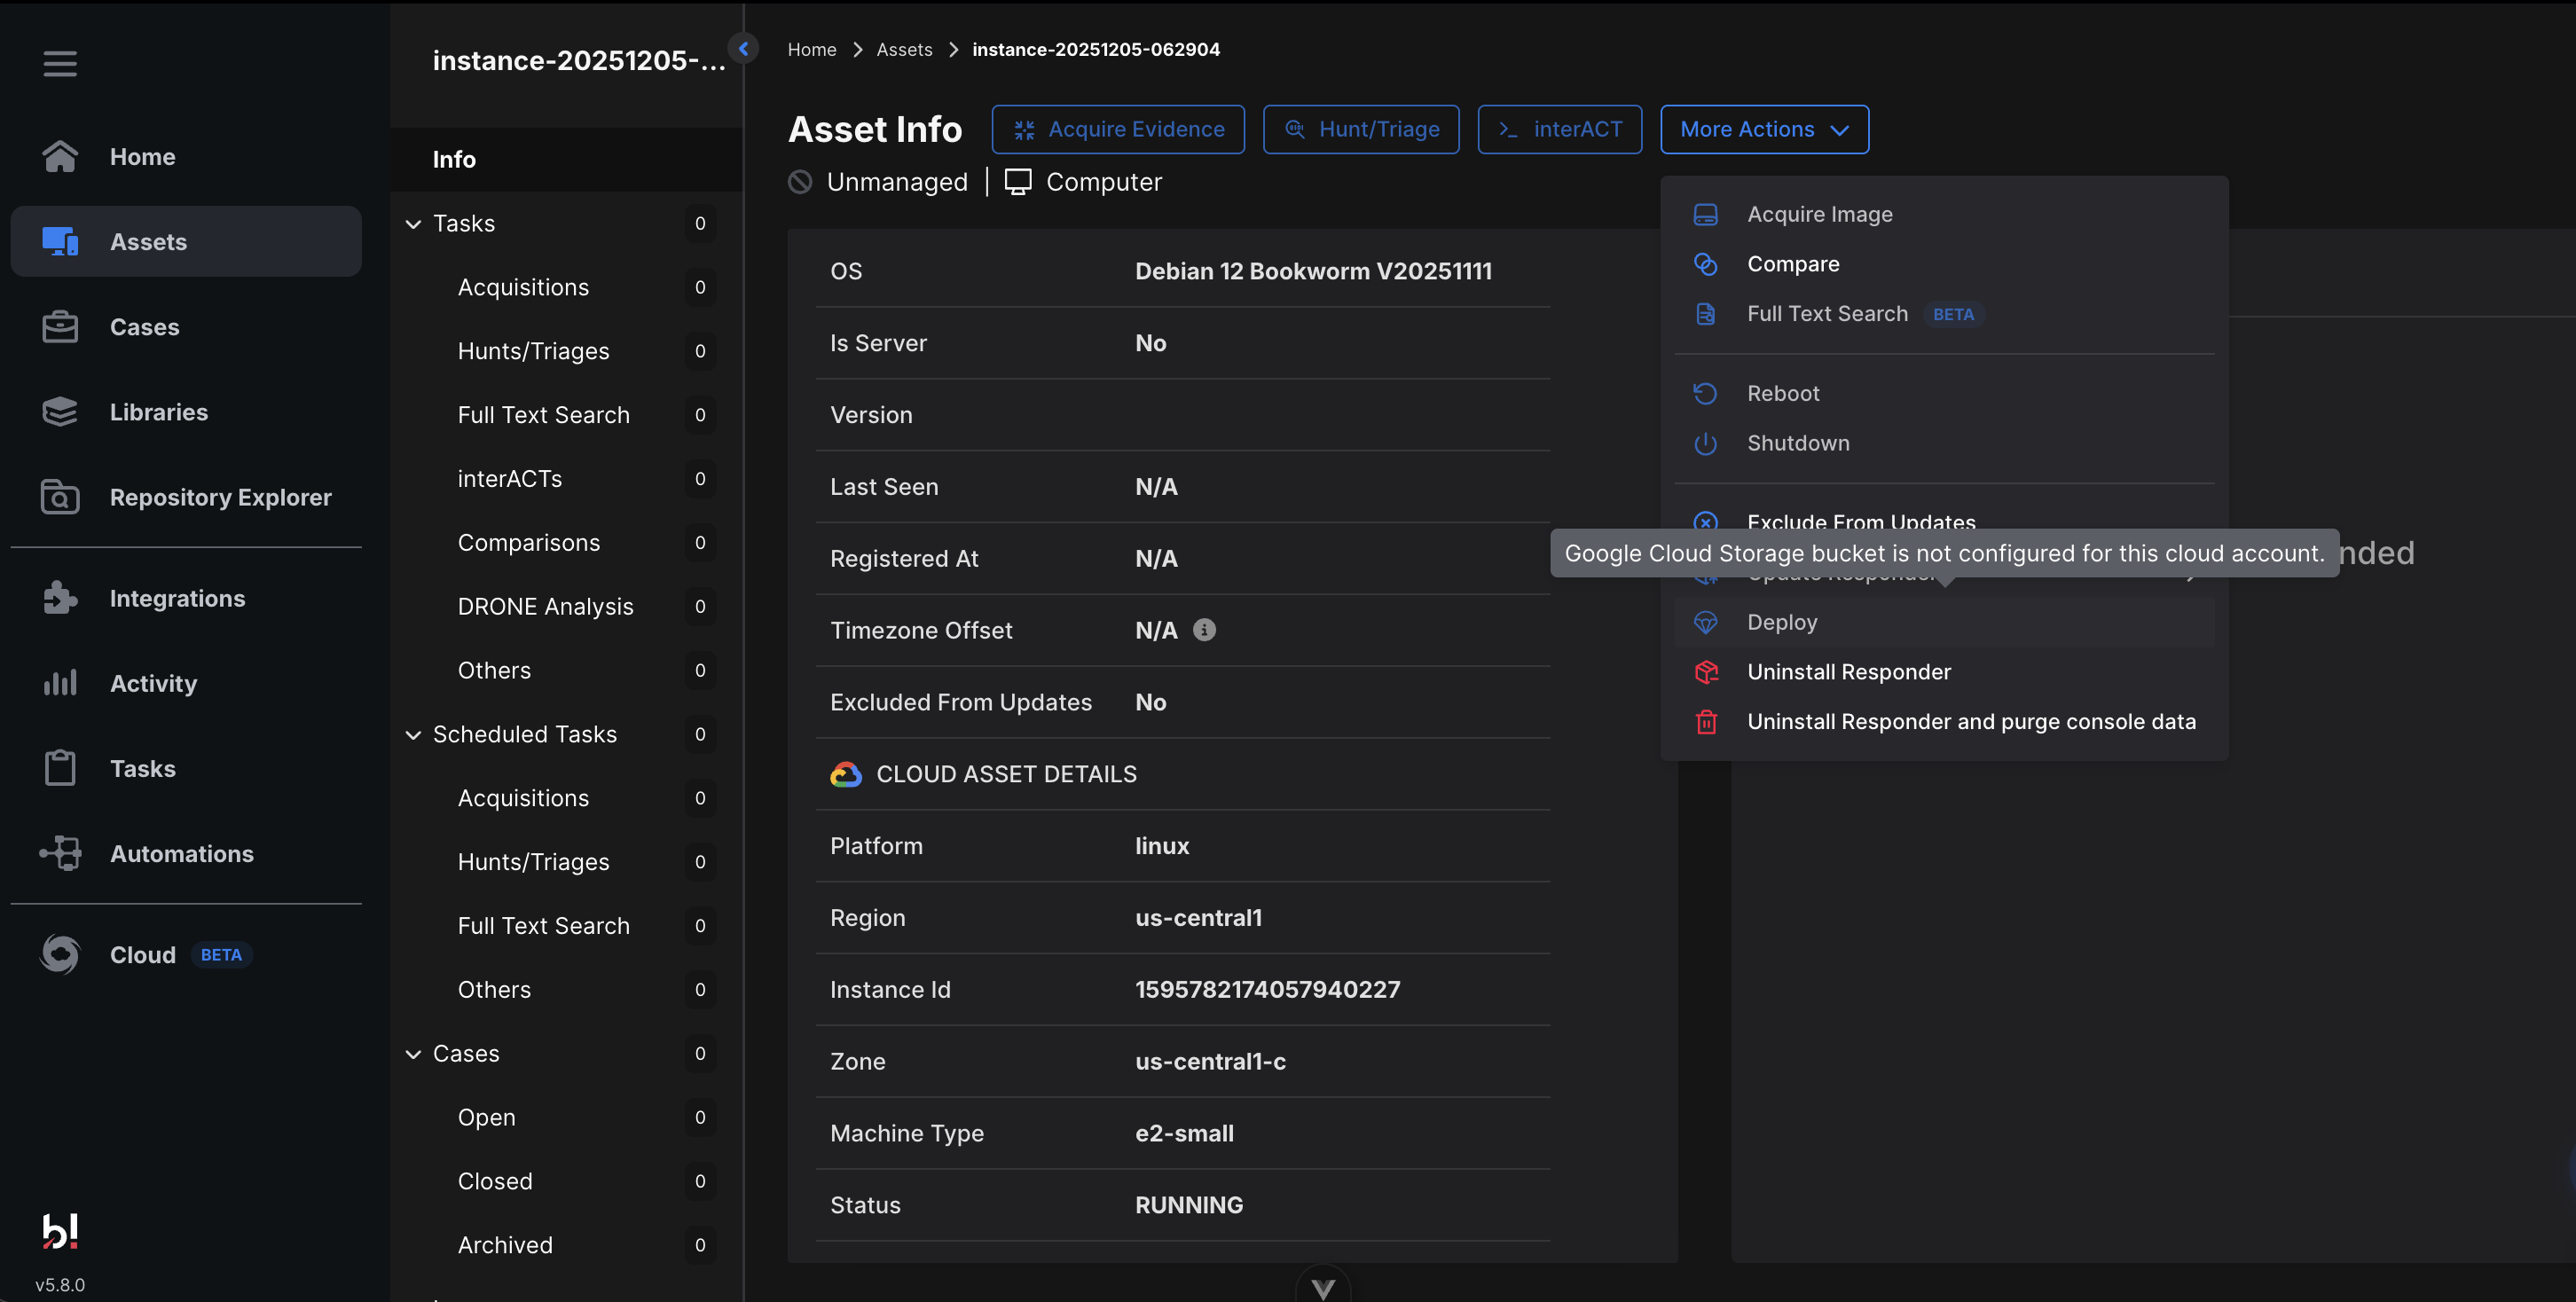
Cloud Forensics: GCS bucket required for Responder deployment
To create a bucket:
- In GCP Console, go to Cloud Storage → Buckets → Create
- Create a bucket in your preferred region
- Return to AIR, edit your GCP account, and enter the bucket name
Deploying Responders to GCP Assets
Section titled “Deploying Responders to GCP Assets”Once your account and bucket are configured:
- Navigate to Assets and locate your GCP instances
- Select one or more assets
- Click More Actions → Deploy Responder
Synchronization and Enumeration
Section titled “Synchronization and Enumeration ”The Console immediately starts to enumerate the cloud platform and retrieves the assets list and asset details after the cloud account is added. It discovers the assets depending on the permissions and authorizations of the cloud accounts. All discovered cloud VMs will be shown under Devices → Cloud Devices (e.g., Amazon AWS, Microsoft Azure, Google Cloud Platform) in the associated organization.
The assets and their details are displayed in the data grid when you select a cloud platform from the Secondary Menu. Assets with deployed AIR responders are shown in blue, while assets without responders are shown in grey.
Responder Deployment
Section titled “Responder Deployment ”All deployment actions are considered tasks by the AIR Console and listed under the Tasks as responder Deployment tasks. Therefore, all responder deployment actions and their status can be seen on the Tasks list.
The primary advantage of responder deployment in a cloud platform is automation. Analysts and investigators don’t need to choose the operating systems and their versions. They only assign deployment tasks to the associated devices, and all deployment processes are performed quicker and easier automatically.
Investigators and analysts can deploy responders to cloud assets:
- From the Main Menu, select Assets, then expand Devices → Cloud Devices and select your cloud platform (e.g., Amazon AWS). All cloud VMs are listed in the data grid where you can search, filter, and view asset details.
- Responders can be deployed individually, via multiple selection, or to all assets at once:
- Individual deploy: Click an asset to open its details, then click the Deploy button
- Multiple selections: Select assets using the checkboxes, then click Actions → Deploy Responder
- Deploy to All Assets: Click the three-dot menu next to the cloud platform name (e.g., Amazon AWS) and select Deploy Responder