Responder Deployment
Installation of the AIR Responder on your assets is managed via the Assets button in the Main Menu:
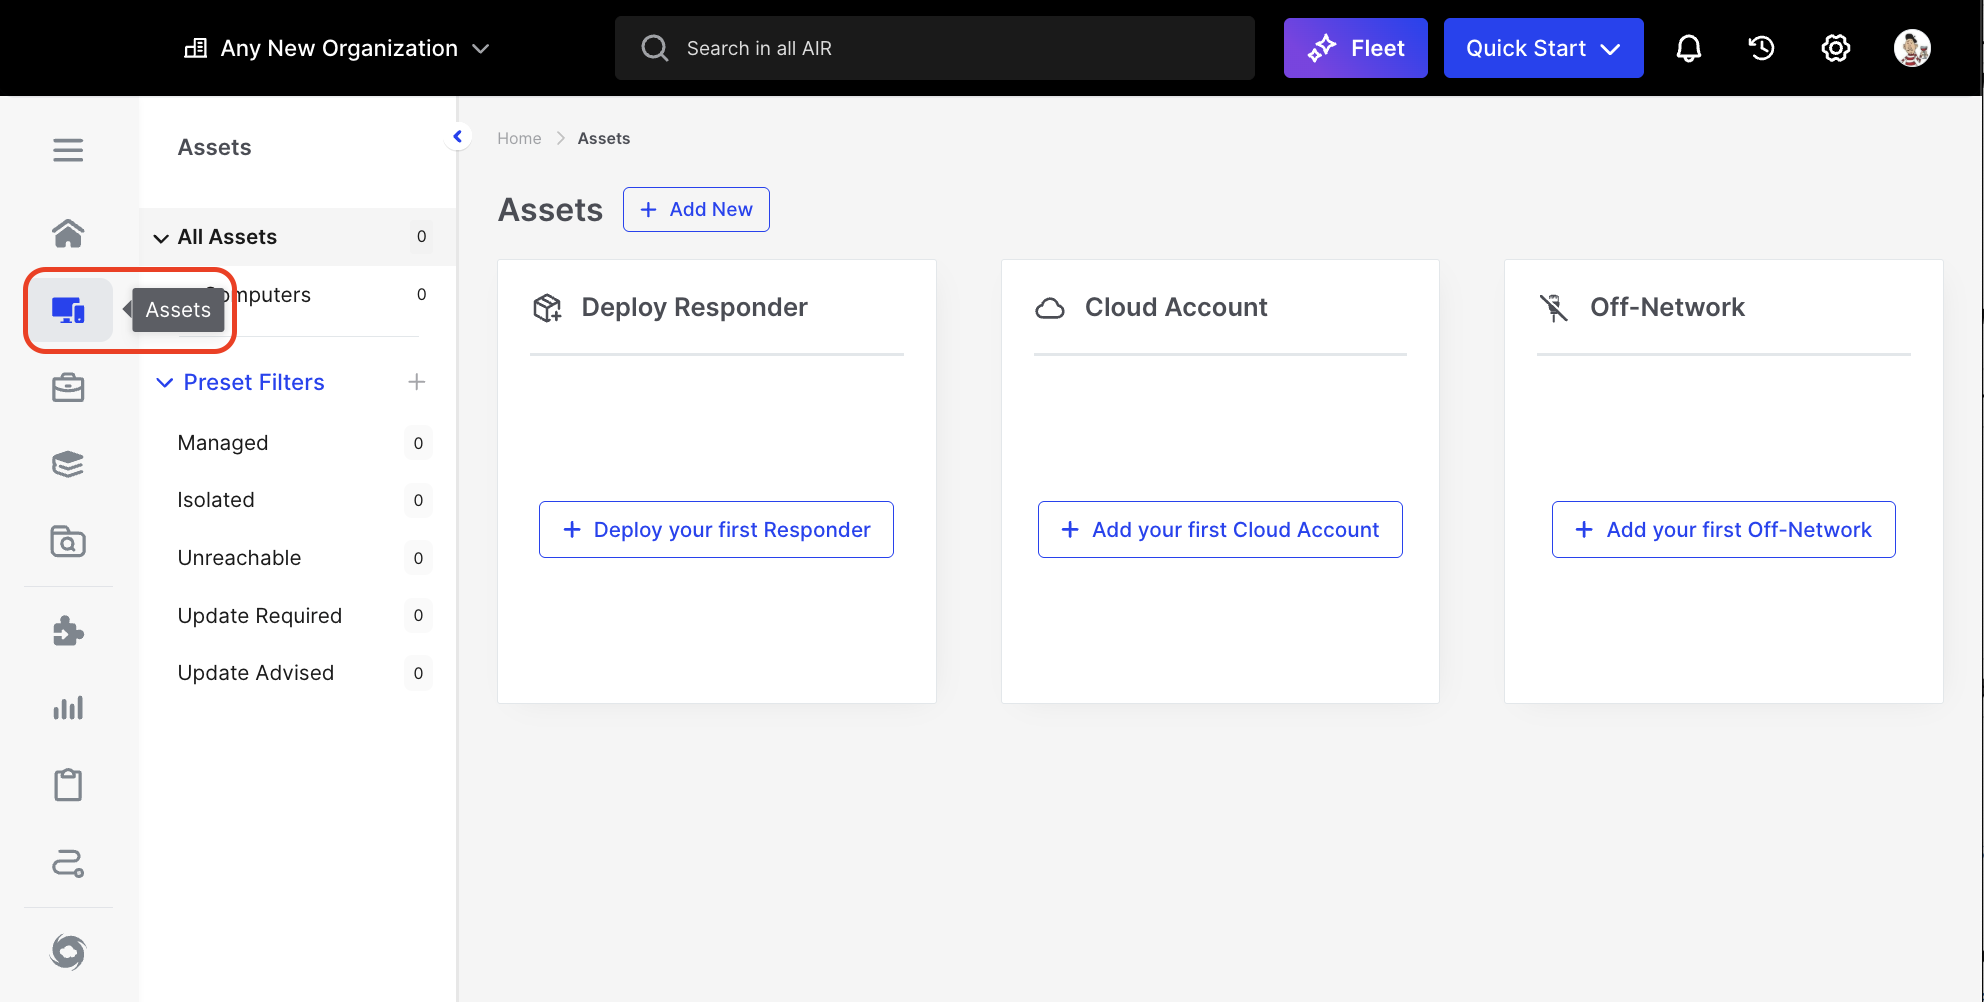
Responder Deployment: Assets button in the Main Menu
The AIR Responder installer is a zero-configuration package that contains the console address already embedded in it.
You can deploy the AIR Responder in multiple ways:
- Downloading an installation package (Windows, macOS, Linux, Chrome, and ESXi)
- Copying a PowerShell Command (Windows)
- Copying a CURL Command (macOS and Linux)
- Copying a WGET Command (macOS and Linux)
- Downloading a PowerShell Script (Windows)
- Downloading the Asset installer (macOS and Linux)
- Manual installation via Active Directory/SCCM.
- Generation of a shareable Deployment Link (Windows, macOS, Linux, Chrome, and ESXi)
| Windows | C:\Program Files (x86)\Binalyze\AIR\agent | 73.png |
| macOS | /opt/binalyze/air/agent | 24.png |
| Linux | /opt/binalyze/air/agent | 23.png |
In the sections that follow, we will look at the deployment of AIR Responders to Windows, Linux, and Mac operating systems.
The AIR Responder is a ‘zero-config’ deployment, as the file name has all the information you need for quickly deploying a Responder.
This level of detail in the filename provides all the information needed as a digitally signed binary - this prevents issues with security solutions, and to date, not one issue has arisen.
The file name example shown here has 4 main components:
AIR.Responder_2.38.7_air-demo.ACME.com_176_9df51c56a73341f4_386_.msi- 2.38.7 - is the Responder version number.
- air-demo.ACME.com - is the address of the console with which the Responder will be communicating
- 176 - is the console’s internal organization number ID.
- And the apparently random mixture of letters and numbers, 9df51c56a73341f4, is the - Deployment Token.
- 386 - describes the processor architecture of the machine on which the Responder will run.
There are multiple ways of deploying the responder, all of which are designed to be quick and scalable. Let’s take a look at the different ways in which you can deploy the AIR Responder to your assets:
From the Main Menu, select Assets, then select Devices from the Secondary Menu. The Action Button labeled ’+ Add New’ appears next to the page name.
When this ’+ Add New’ button is selected, three options are offered in a drop-down menu:
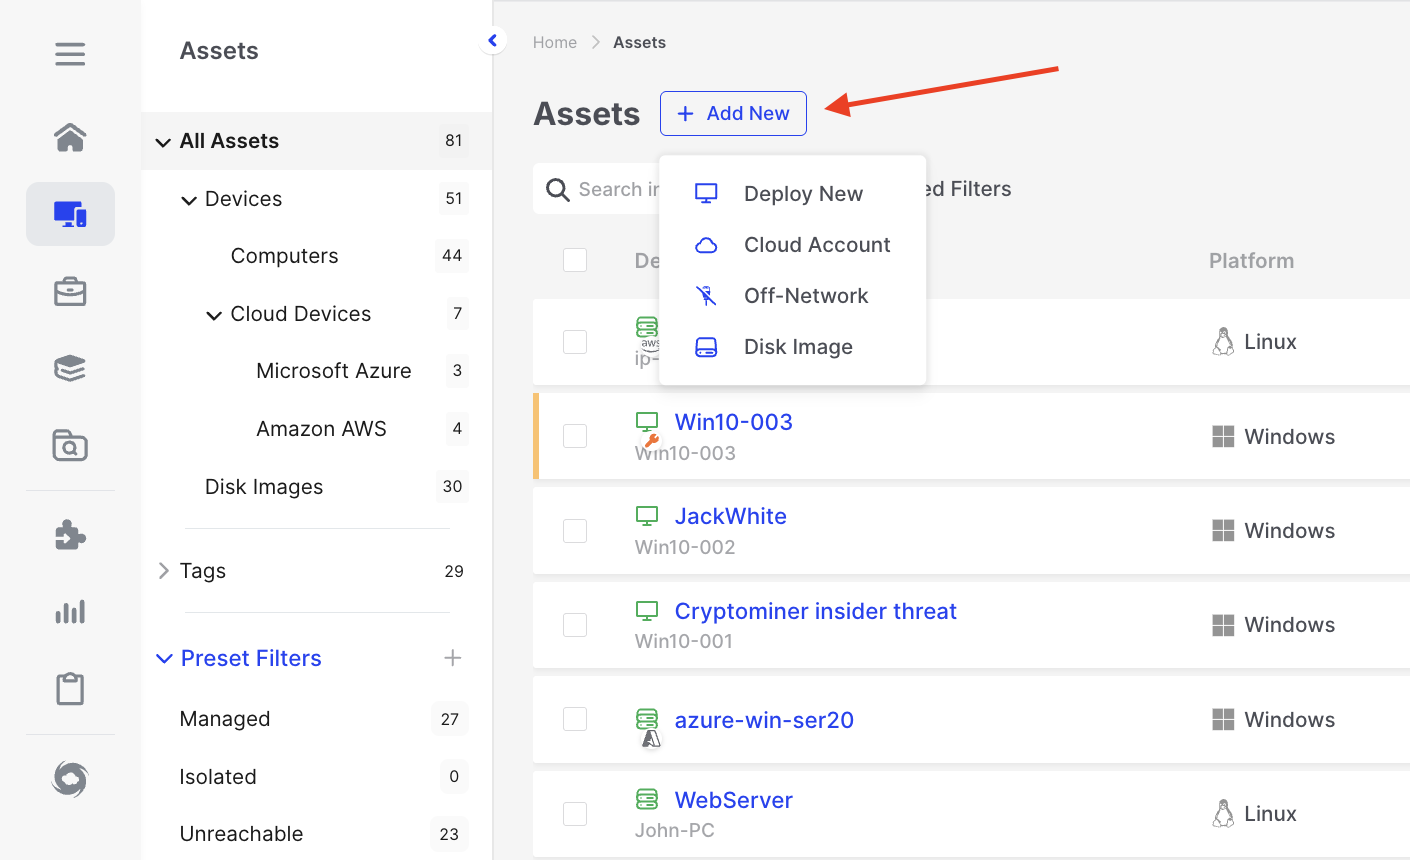
Responder Deployment: Three deployment options for adding AIR Responders to assets.
Each one of the options will present the user with a wizard that will walk through the options needed for the chosen deployment method:
- Deploy New - For assets that are attached to a network that is visible to the AIR console
- Cloud Account - For assets that reside in AWS EC2, and Virtual Machines in Microsoft Azure.
- Off-Network - To generate triage and collection packages for assets that are not connected to a visible network.
Deploy Responder to New Asset Wizard
Section titled “Deploy Responder to New Asset Wizard”- When you choose ‘Deploy New’, you’ll be prompted via a wizard to determine if the Responder should establish a direct connection to the AIR console or if utilizing a Relay Server connection would be more suitable for your environment. Relay Server is explained here.

Responder Deployment: Select a connection route
- The second step of the deployment wizard offers distinct deployment options for all currently supported network-attached operating systems: Windows, Linux, and macOS.

Responder Deployment: Choose Platform
Windows PowerShell Command:
Section titled “Windows PowerShell Command:”- The command varies based on the Organization affiliation. An example PowerShell command to copy is provided below:
[System.Net.ServicePointManager]::ServerCertificateValidationCallback = {$true}(New-Object System.Net.WebClient).DownloadFile("https://air-demo.ACME.com/api/endpoints/download/0/deploy/windows?deployment-token=d297145XXXXXXXX", "$PWD\deploy-responder.ps1").\deploy-responder.ps1Windows PowerShell Script:
Section titled “Windows PowerShell Script:”- This script can be downloaded from your AIR Console. Ensure you select or are working in the appropriate Organization before downloading.
<#2022-2024 (c) AIRAIR Responder Powershell Script for WindowsPLEASE DO NOT EDIT! This file is automatically generated at 2024-05-02T13:49:58VERSION 2.39.9#>
<#.SYNOPSIS    This script installs the AIR Responder using given parameters or default values are used.    This script requires administrator privileges!
    MSI file is temporarily stored in %LOCALAPPDATA%\binalyze\air\agent.DESCRIPTION    Powershell script to deploy the AIR Responder..PARAMETER Version    The version of the AIR Responder to be deployed..PARAMETER ConsoleAddress    The address of the AIR Console without https:// prefix, only domain address..PARAMETER OrganizationId    The organization id to register the AIR Responder..PARAMETER DeploymentToken    A Valid deployment token to deploy the AIR Responder..PARAMETER ConnectionRouteID    Set Connection Route Id for the AIR Responder..PARAMETER ConnectionRouteAddress    Set Connection Route Address for the AIR Responder..PARAMETER AllowInsecureTlsVersion    Allow insecure TLS version for the AIR Responder.#>
Param ([string]$Version="2.39.9",       [string]$ConsoleAddress="air-demo.ACME.com",       [string]$OrganizationId="0",       [string]$DeploymentToken="d297145dXXXXXXXX",       [string]$ConnectionRouteID="{{.AIR_CONNECTION_ROUTE_ID}}",       [string]$ConnectionRouteAddress="{{.AIR_CONNECTION_ROUTE_ADDRESS}}",       [switch]$AllowInsecureTlsVersion)
$downloadDir = "$env:LOCALAPPDATA\binalyze\air\agent"
Remove-Item $downloadDir -Force -Recurse -ErrorAction IgnoreNew-Item -Path $downloadDir -ItemType DirectoryPush-LocationSet-Location -Path $downloadDir
$arch = "386"if ([Environment]::Is64BitProcess) {    $arch = "amd64"}
if ($ConnectionRouteID -like '{*') {    $ConnectionRouteID = ""}if ($ConnectionRouteAddress -like '{*') {    $ConnectionRouteAddress = ""}
$fileSuffix = ""if ($ConnectionRouteID) {    $fileSuffix = "{0}_{1}_" -f $arch,$ConnectionRouteID    if ($ConnectionRouteAddress) {        $fileSuffix = "{0}{1}_" -f $fileSuffix,$ConnectionRouteAddress    }}
$file = "{0}\AIR.Responder_{1}_{2}_{3}_{4}_{5}.msi" -f $downloadDir,$Version,$ConsoleAddress,$OrganizationId,$DeploymentToken,$fileSuffix$url = "https://{0}/api/endpoints/download/{1}/windows/msi/{2}?deployment-token={3}" -f $ConsoleAddress,$OrganizationId,$arch,$DeploymentToken
Write-Debug "file: $file"Write-Debug "url:  $url"
if ($AllowInsecureTlsVersion) {    Write-Host "Allowed insecure TLS versions for the AIR Responder. If this flag is set, the AIR Responder will connect to the AIR Console with system default TLS version"} else {    try {        [System.Net.ServicePointManager]::SecurityProtocol = [System.Net.SecurityProtocolType]::Tls12 -bor [System.Net.SecurityProtocolType]::Tls13    } catch {        Write-Host "TLS1.3 and TLS1.2 is not supported on this operating system, please try to use AllowInsecureTlsVersion flag."    }}
[System.Net.ServicePointManager]::ServerCertificateValidationCallback = {$true}(New-Object system.net.webclient).DownloadFile($url,$file)
$process = Start-Process C:\Windows\System32\msiexec.exe -ArgumentList "/i $file /quiet /norestart" -PassThru -Wait$process.WaitForExit()if ($process.ExitCode -eq 0) {    Write-Debug "AIR Responder is installed successfully."    Remove-Item -Path $file -ErrorAction Ignore} else {    Write-Debug "MSI failed. ExitCode: $($process.ExitCode)"    Pop-Location    exit $process.ExitCode}Pop-Location
SCCM Deployment for Windows Responder:
Section titled “SCCM Deployment for Windows Responder:”- If you prefer, the Windows responder can be deployed using SCCM with the following command:
msiexec /i AIR.responder_2.24.2_air-demo.ACME.com_0_d297145XXXXXXXX_.msi /qn /norestartFor a silent installation you can use the following command:
msiexec /i AIR.responder_2.26.4_air-demo.ACME.com_176_9df51c56XXXXXXXX_.msi /qn /norestartWindows Responder MSI Download:
Section titled “Windows Responder MSI Download:”- The MSI for the Windows Responder can be downloaded directly from the page, as depicted in the screenshot below:
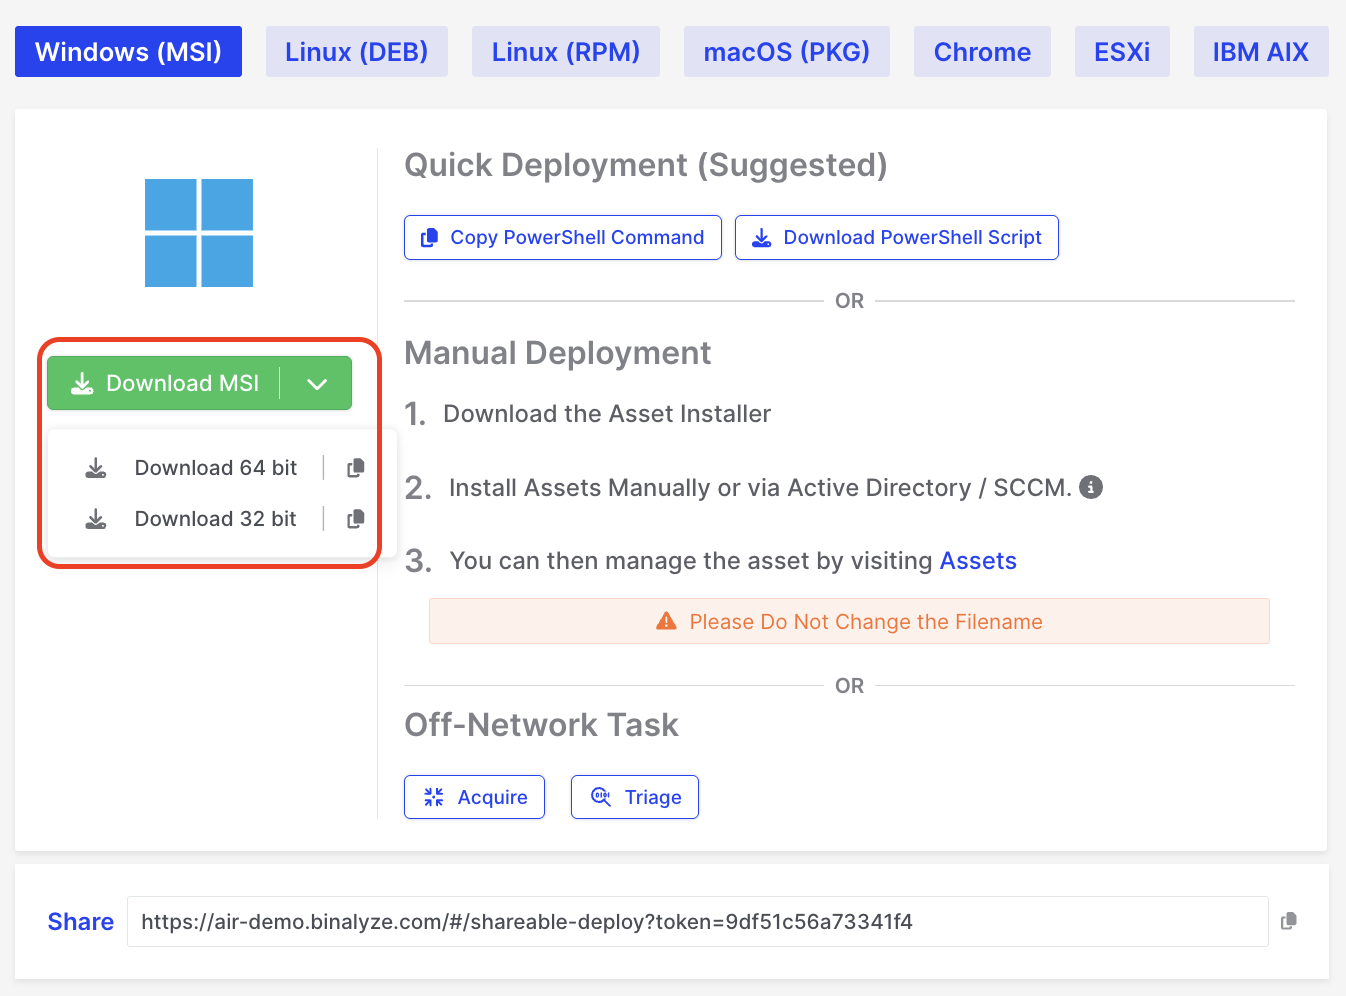
Responder Deployment: MSI Download
Shareable Deployment Link for Windows/Linux/macOS:
Section titled “Shareable Deployment Link for Windows/Linux/macOS:”- All three operating systems support the Shareable deployment link available in the console. This method is often the most straightforward—simply share the link with your client, allowing them to download and install the Responder. An example link is shown below:
https://air-demo.ACME.com/#/shareable-deploy?token=d297145dXXXXXXXXmacOS and Linux Deployments:
Section titled “macOS and Linux Deployments:”- Unlike Windows, macOS and Linux do not utilize PowerShell commands or scripts. Instead, they can employ CURL or WGET commands. Alternatively, you can use the Shareable deployment page link mentioned above.
Example of CURL deployment command:
sudo curl -kfsSL "https://air-demo.ACME.com/api/endpoints/download/176/deploy/darwin?deployment-token=9df51c56XXXXXXXX" | sudo shExample of WGET deployment command:
sudo wget --no-check-certificate -O- "https://air-demo.ACME.com/api/endpoints/download/176/deploy/darwin?deployment-token=9df51c56XXXXXXXX" | sudo shGranting Full Disk Access for Responder on macOS
Section titled “Granting Full Disk Access for Responder on macOS”After installing a responder on macOS, users will need to grant Full Disk Access permission. To guide users through this process, a pop-up will appear after installation stating: “Allow AIR to access files on your disk. Open System Settings > Security & Privacy > Full Disk Access to grant permission to “AIR”.
If Full Disk Access permission is not granted when starting any Acquisition, this will be shown in the Acquisition logs:

Responder Deployment: Full Disk Access permission is not enabled
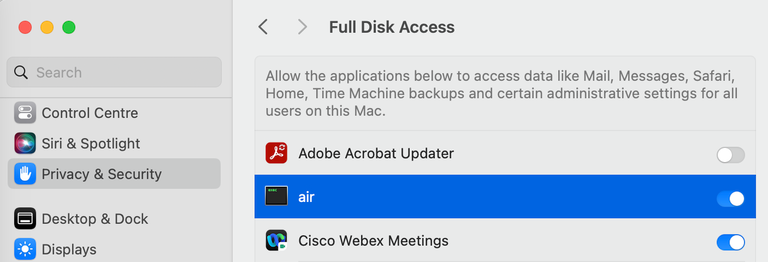
Responder Deployment: Full Disk Access toggled on
After toggling on the FDA on this page, select the /opt/binalyze/air/agent/air file in the file manager that opens. Once this is done, our responder will appear in the list under the name ‘air’, ready for the user to toggle ‘on’.
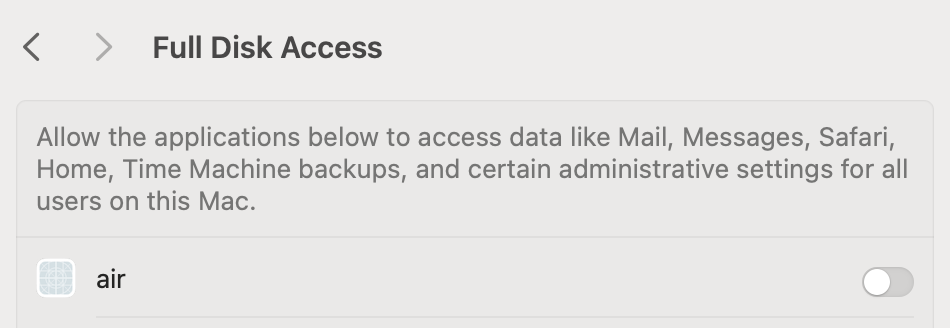
Responder Deployment: Allow access to data
Why is there no logo next to AIR on the Full Disk Access page in macOS?
Section titled “Why is there no logo next to AIR on the Full Disk Access page in macOS?”The AIR responder operates as an executable binary running as a service rather than a traditional macOS application. This approach ensures consistency across platforms like Linux and macOS.
Since AIR is not packaged as a macOS app, it does not include a .plist file, which typically contains the application icon metadata. Consequently, it cannot display a logo on the Full Disk Access page.
This design choice does not affect the functionality or performance of AIR.
Problem with MDM Installation
Section titled “Problem with MDM Installation”While the pop-up effectively guides users in manually installed scenarios, it presents challenges for enterprise environments where macOS devices are managed via Mobile Device Management (MDM). MDM allows remote application installation and security policy enforcement, including granting Full Disk Access.
Customers prefer silent installations for MDM-deployed responders, as permissions are already set through security policies, eliminating the need for pop-ups. However, our current setup cannot distinguish between user-initiated and MDM-initiated installations, resulting in the pop-up appearing in all cases.
We are actively working on a solution to address this issue for seamless enterprise deployments.