Evidence Repositories
By default, AIR supports saving collected evidence locally on the asset with paths set as Binalyze\AIR for Windows, /opt/binalyze/air for Linux, and /opt/binalyze/air for macOS. Alternatively, users can opt to send their collections to Evidence Repositories, such as network shares, SMB, FTPS, SFTP, or to cloud storage, including AWS S3 buckets, S3-compatible object storage (e.g. MinIO, Wasabi, Backblaze B2), Azure Blob Storage, and Google Cloud Storage (GCS).
The term Evidence Repository describes a remote location, separate from the actual asset subject to the tasking assignment, whether it is one of the seven currently supported storage options.
You can create Evidence Repositories in three different ways:
- From the “Evidence Repositories” page
- During Policy creation
- During the Acquisition task creation
A common query from our customers concerns the configuration of the Evidence Repository and its interaction with the AIR Console, particularly regarding evidence uploads and the required network permissions. Here’s what you need to know:
Evidence Upload Process
Section titled “Evidence Upload Process”When configuring the Evidence Repository, it’s essential to understand the pathway through which evidence files are uploaded. Specifically, there might be confusion about whether these uploads occur directly from the assets to the Evidence Repository or if they go through the AIR console.
To clarify: Evidence files are uploaded directly from the assets to the Evidence Repository. This process necessitates configuring your firewall to permit traffic from the asset to the Evidence Repository on the relevant ports. For example, if using SMB for evidence transfer, you must allow access through port 445.
AIR Console Access
Section titled “AIR Console Access”For the File Explorer feature within the AIR console to function correctly, the AIR console requires access to the Evidence Repository. This setup ensures that users can seamlessly browse and interact with the stored evidence directly through the AIR console interface.
Configuring Your Firewall
Section titled “Configuring Your Firewall”Given these operational details, it’s necessary to adjust your firewall settings accordingly:
- Allow traffic from your assets to the Evidence Repository, particularly if you are using specific protocols, such as SMB on port 445.
- Ensure the AIR Console has access to the Evidence Repository to enable full functionality of the File Explorer feature.
Creating an evidence repository from “Evidence Repositories”
Section titled “Creating an evidence repository from “Evidence Repositories””1. Navigate to the Evidence Repositories section by clicking the Settings button in the Main Menu and then select “Evidence Repositories” from the Secondary Menu.
2. Click the “+Add New” button at the top of the page.
3. From the New Evidence Repository window, provide a name to the repository and then select the relevant repository.
4. Depending on the type of evidence repository you choose, the required fields are adjusted accordingly:
- Path: The location that is polled for evidence. If the IP address of the repository is “172.16.1.1”, and the folder name is “Share”, the path will be “\\172.16. 1.1\Share” without quotes.
- Username (if required)
- Password (if required)
- Host: Hostname or IP address of the SFTP server.
- Port: The port on which the SFTP server is listening to. The default port for SFTP is 22.
- Path: The location directory that is polled for evidence.
- Username (if required)
- Password (if required)
- Host: Hostname or IP address of the FTPS server.
- Port: The port on which the FTPS server is listening. The default port for FTPS is 21.
- Path: The location directory that is polled for evidence.
- Username (if required)
- Password (if required)
Amazon S3
Section titled “Amazon S3”- Region: Region name for the bucket that was created in.
- Bucket: Name of the bucket
- Access Key ID
- Secret Access Key
Note: IAM users must have proper rights and permissions to access the S3 bucket.
S3 Compatible (AIR 5.20+)
Section titled “S3 Compatible (AIR 5.20+)”Use this repository type for any S3 API–compatible object storage that is not native AWS S3 — for example self-hosted or third-party providers such as MinIO, Wasabi, Backblaze B2, Cloudflare R2, DigitalOcean Spaces, IBM/Oracle/Scaleway Object Storage, Dell ECS, NetApp StorageGRID, and Hetzner Object Storage. It uses the same access key credential model as Amazon S3, but additionally requires a custom service Endpoint and a Provider Name.
Configuration Fields:
| Field | Required | Description | Example |
|---|---|---|---|
| Provider Name | Yes | The S3-compatible provider. Pick one from the built-in list or type your own. Used as the repository’s displayed type and for filtering. | MinIO |
| Endpoint | Yes | Custom S3-compatible endpoint URL. Both http and https are supported. Path-style addressing is forced automatically for compatibility. | https://s3-compatible.example.com |
| Region | Yes | Free-text region value. Many providers accept auto or a specific value such as us-east-1; forward whatever value your provider expects. | auto |
| Bucket | Yes | Name of the bucket where evidence is stored. | evidence-storage-prod |
| Access Key ID | Yes | Access key for the provider. | — |
| Secret Access Key | Yes | Secret key for the provider (stored encrypted). | — |
The Console validates the configuration by performing a write test to the bucket before saving the repository.
Differences vs. Amazon S3:
- Amazon S3 is for native AWS only — its Region is selected from a fixed AWS region list and no endpoint is required.
- S3 Compatible requires a custom Endpoint and a Provider Name, and its Region is a free-text field.
Supported Tasks:
AIR Responders can use an S3-compatible repository for:
- Acquisition tasks (including direct collection)
- Acquire image tasks
- interACT get command (send-to)
- Repository Explorer (browse, download, and upload)
Azure Blob
Section titled “Azure Blob”- Shared Access Signature (SAS) URL &#xNAN; See https://docs.microsoft.com/en-us/azure/storage/common/storage-sas-overview for details.
- To generate a SAS URL, please refer to this link: Generating a SAS URL
Google Cloud Storage (GCS) (AIR 5.11+)
Section titled “Google Cloud Storage (GCS) (AIR 5.11+)”Prerequisites:
| Requirement | Description |
|---|---|
| GCP Account | Active Google Cloud Platform project |
| GCS Bucket | Bucket for evidence storage |
| Service Account | Service account with JSON key credentials |
| IAM Role | Storage Object Creator: Sufficient for Evidence Repository when used for acquisition, interACT get, and image tasks (upload only). Storage Object Admin (Recommended): Required for both Evidence Repository and Repository Explorer operations. |
Configuration Fields:
| Field | Description | Example |
|---|---|---|
| Bucket Name | Target GCS bucket | evidence-storage-prod |
| Project ID | GCP project ID | my-project-123 |
| Service Account Email | Service account email | [email protected] |
| Private Key | RSA private key (PEM format) | Must include BEGIN/END markers |
The Console validates the configuration by testing the GCS connection before saving.
Supported Tasks:
AIR Responders can perform the following actions with GCS:
- Acquisition tasks (including direct collection)
- Acquire image tasks
- interACT get command
- interACT image command
Creating an evidence repository during Policy creation
Section titled “Creating an evidence repository during Policy creation”1. Select the Settings button in the Main Menu and then select “Policies” from the Secondary Menu.
Click the “+Add New” button at the top of the page
2. Provide a name to the repository and then select the relevant repository type:
3. Select the relevant repository type by clicking on it.
4. Click the “Save” button.
5. The newly created repository will appear in the drop-down list. Select the relevant repository and finalize the process.
Creating an evidence repository during the acquisition task creation
Section titled “Creating an evidence repository during the acquisition task creation”1. From the “Acquire Evidence” pane, click on the Evidence Repository radio button under the “Save Collected Evidence To” section.
2. Click in the “Repository” box and then select “+ Add new repository”:
3. From the window ‘New Repository’, complete the mandatory fields and select the type of repository you wish to add. There are seven options:
- SMB
- SFTP
- FTPS
- Amazon S3
- S3 Compatible (AIR 5.20+)
- Azure Blob
- Google Cloud Storage (GCS) (AIR 5.11+)
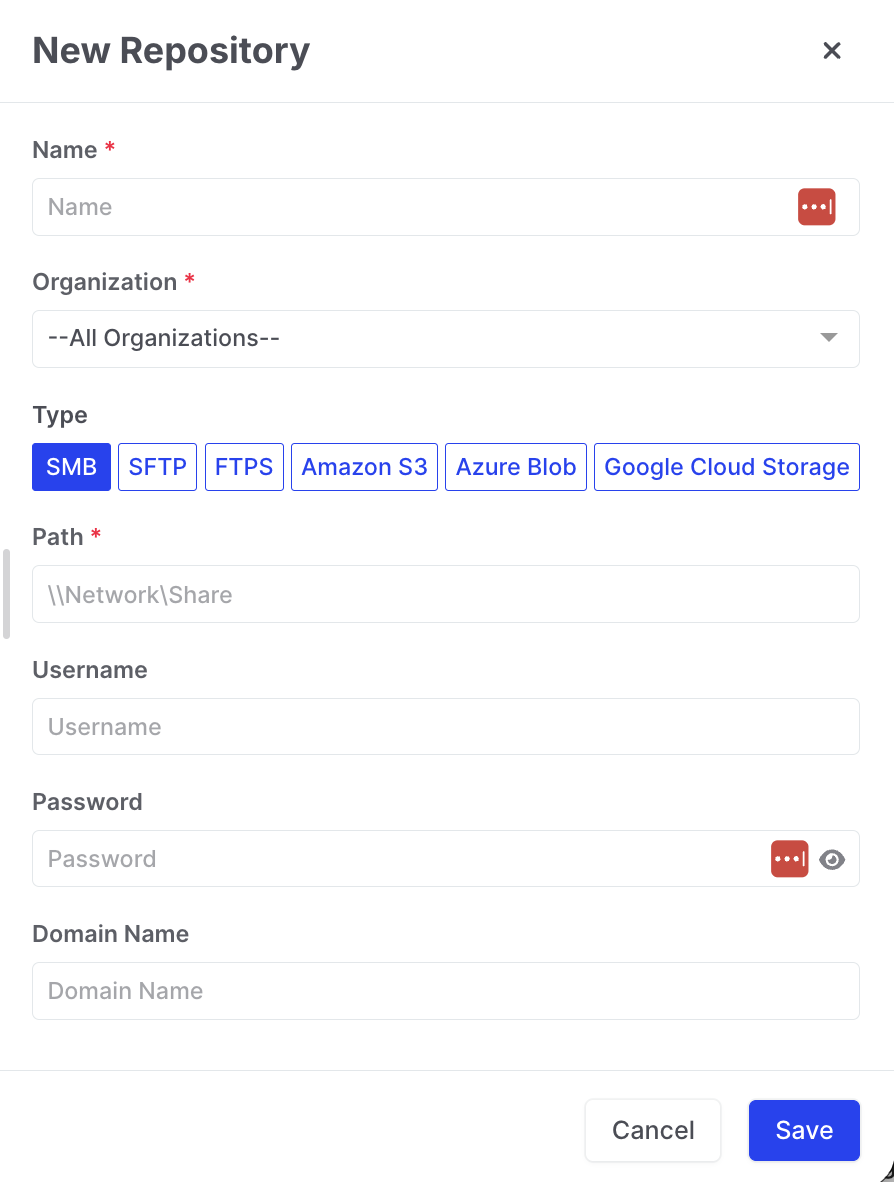
Evidence Repositories: New Repository Wizard
4. The newly created repository will appear in the drop-down list. Select the repository you want for this particular acquisition and finalize your Acquisition Task via the wizard.