LogoLogo
Back to binalyze.com
  • Welcome | Binalyze Knowledge Base
  • AIR
    • AIR
      • What is AIR?
      • Terminology
      • Architecture
        • AIR Responder Architecture; overview and performance analysis
        • AIR Task Flow and Management
      • Network Communication
      • Cloud Forensics
    • Setup
      • Console Hardware Requirements
      • Console Pre-Installation
      • Console Installation
      • Microsoft Azure Cloud Platform Integration
      • AIR Relay Server
        • What is AIR Relay Server?
        • Requirements for installation
        • How to install a Relay Server on different Linux platforms
        • How to change IP address of Relay Server
        • How to install a Responder with Relay Server support
        • Proxy configurations
          • Adding proxy to Relay Server
          • Adding proxy to Responder
        • Service Management for Relay Server
        • Whitelisting for Relay Server
        • Retrieving metrics from Relay Server
        • Updating and Uninstalling Relay Server
        • Troubleshooting
      • AIR Responder - Supported Operating Systems
        • AIR Responder - MS Windows supported systems
        • AIR Responder - Apple macOS supported systems
        • AIR Responder - Linux (DEB/RPM) supported systems
        • AIR - ESXi Standalone Collector
        • AIR Responder - Chrome supported systems
          • AIR For Chrome
      • AIR Responder Hardware Requirements
      • AIR Responder Deployment
        • Golden Image
        • Responder & Active Directory OUs
        • AIR Responder Exception Rules
          • Binalyze AIR Watchdog Folder
        • FDA via Jamf and Apple’s PPPC utility
        • AIR Responder in Windows 'Safe Mode'
      • Uninstalling AIR Responders
      • Security
        • AIR Console Access Control
        • AIR SSL Enforcement
          • SSL Certificate Management in Binalyze AIR
        • Two-factor authentication (2FA)
      • Post-Deployment Configuration Guide
        • Using AIR CLI on Binalyze AIR Console
    • Settings
      • General
      • Assets
      • Security
      • Features
      • Evidence Repositories
      • Policies
      • User Management
        • User Groups
        • User Roles
      • Backup
      • Investigation Hub Disk Usage
      • Danger Zone
    • Updating
      • Single-Tier Systems
      • 2-Tier Systems
      • AIR Console Updating - SaaS
    • Backup
      • Restore AIR Backup using the CLI
    • Features
      • Acquisition
        • Task Creation
          • Regex in AIR/DRONE:
          • Asset Management with Persistent Saved Filters
          • Task Cancellation and Deletion
        • Acquisition Profiles
        • Supported Evidence
          • Windows Collections
          • macOS Collections
          • Linux Collections
          • IBM AIX Collections
        • Scheduling Tasks
        • Disk and Volume Imaging
          • Imaging with interACT
        • Chain Of Custody in AIR
      • Auto Tagging & Tags
        • Tags
      • Triage
        • Triage Rule Templates
          • YARA Templates
          • Sigma Templates
          • osquery Templates
        • Schedule Triage Tasks
      • interACT
        • interACT Commands
        • PowerShell commands in interACT
      • Compare
      • Timeline
      • Integrations
        • SSO Integrations
          • Microsoft Azure SSO Integration
          • Okta SAML 2.0 SSO Integration
        • Webhooks
          • Mattermost Integration
          • Splunk Integration
          • IBM QRadar Integration
          • Wazuh Integration
          • Cortex XSOAR Integration
          • Elasticsearch Logstash Kibana Integration
          • ServiceNow Integration
          • Sumo Logic Integration
          • Crowdstrike Integration
          • Microsoft Sentinel Integration
          • Slack Integration
          • Carbon Black Cloud Integration
          • Rapid7 InsightIDR Integration
          • LogicHub SOAR (DEVO) Integration
          • Fortigate SIEM Integration
          • Dynatrace Integration
          • Stellar XDR Integration
          • SentinelOne Integration
          • Microsoft 365 Defender Integration
          • Cisco XDR Integration
      • Event Subscription
      • API
        • API in AIR is likely to be more effective than Webhooks
      • DRONE
        • What is DRONE?
        • What is an Analysis Pipeline?
        • Analyzers
          • Cross Platform Analyzers
            • MITRE ATT&CK Analyzer
              • MITRE ATT&CK Analyzer changelog
            • Dynamo Analyzer
            • Browser History Analyzer
            • Generic WebShell Analyzer
          • Windows Analyzers
            • Windows Event Records and how AIR handles them
              • Windows Event Logs in AIR v4.21 and older versions
              • Event Records Summary vs. Event Records
            • Prefetch Analyzer
            • Shellbag Data Fields
          • Linux Analyzers
          • macOS Analyzers
            • Audit Event Analyzer
      • Investigation Hub
        • Using the Investigation Hub
        • Investigation Hub – Data Usage Statistics Dashboard
      • Evidence Repositories
      • File Explorer
        • File Explorer - FAQs
      • Tornado (Preview Version)
        • Tornado Installation Guide
          • Tornado Operating System Support
        • Updating Tornado
        • Tornado demo video
        • Getting Started with Tornado
          • Tornado Terminology
        • Tornado Collectors
          • Accessing Google Workspace
            • Service Account Creation
              • Enable Service Account Key Creation
          • Access Modes in O365
            • O365 license types
        • Tornado Troubleshooting & Feedback
        • Tornado FAQs
      • Frank.AI
      • Asset Isolation
      • Policies
      • Off-Network Responder
        • Setting Up a Custom Case Directory
        • biunzip
          • biunzip password file
      • Responder Proxy Support
      • Proxy Configuration on the Console
      • Console Audit Logs
    • Troubleshooting
      • Binalyze AIR Console CPU Profiling for Performance Issues
      • Understanding MSI Error Code 1618
      • How to gather Binalyze AIR logs for Troubleshooting
        • Collecting Binalyze AIR Console Log Files
        • Collecting Binalyze AIR Responder Log Files
        • Collecting Binalyze AIR Off-Network Responder Log Files
    • FAQs
      • Binalyze AIR Console Migration Procedure For Single-Tier Setup
      • Binalyze AIR Console Migration Procedure For 2-Tier Installation
      • Binalyze AIR Console Backup Procedure
      • Resolving the “Invalid Host Header. Host must be the Console Address” Error
      • How to download the collected evidence and artifacts in Binalyze AIR?
      • How to gather Binalyze AIR logs for Troubleshooting
        • Collecting Binalyze AIR Console Log Files
        • Collecting Binalyze AIR Responder Log Files
        • Collecting Binalyze AIR Off-Network Responder Log Files
      • AIR responder troubleshooting
      • Understanding Port Usage in Binalyze AIR
      • How many assets can connect to a single Console instance?
      • How do I enable SSL on AIR?
      • Can I use AIR with EDR/XDR Products?
      • Can I integrate AIR with my SOAR/SIEM?
      • What (sub)domains are used by AIR?
      • Docker & Host System IP Conflict
      • Monitoring Responder and UI API's
      • How do I update AIR Console?
      • How do I update AIR Responders on assets?
      • How to reset the password of a user via the AIR-CLI?
      • Is there a way to move an asset from one Organization or Case to another?
      • Creating exclusions/exception rules for Binalyze AIR Responder on EPP and EDR Solutions
      • Anything missing?
      • How can I install a version of AIR that isn't the latest?
  • General
    • Licenses - Open-Source Software List
Powered by GitBook
On this page
  • interACT Imaging Options
  • Imaging output and the metadata.yml file
  • Understanding errors documented in the metadata.yml file

Was this helpful?

Export as PDF
  1. AIR
  2. Features
  3. Acquisition
  4. Disk and Volume Imaging

Imaging with interACT

interACT has an imaging command with several options/switches to allow users to read a disk or volume and write its contents out as a .dd file. As seen on the previous page, this can also be done from the AIR UI but remains here in interACT for those who prefer to image from the command line.

interACT Imaging Options

   --list, -l                           list available disk/volume devices (default: false)
   --input value, -i value              read disk device from given input
   --output value, -o value             write output file(s) to a repository or directory. Use 'repository' to upload to evidence repository set at session start
   --max-chunk-size value, -c value     maximum chunk size in bytes or use suffix K,M,G. Use 0 to use dynamically calculated chunk size (default: "512M")
   --chunk-retry-count value, -r value  number of retries for chunk creation attempts when output is repository. If output is a directory, this flag is ignored (default: 1024)
   --start-offset value, -s value       start offset in bytes or use suffix K,M,G (default: "0")
   --max-chunk-count value, -n value    maximum number of chunks to create. 0 value dynamically calculates the number of chunks (default: 0)
   --block-size value, -b value         input block size in bytes or use suffix K,M,G. This must be multiple of logical sector size. Bigger values will result in faster reads but will skip the same amount of data on each read if read error occurs. 1M is a good value for most cases. (default: "1M")
   --file-prefix value, -p value        prefix for output file name(s)
   --no-proxy                           bypass proxy if enabled while transferring file to a repository (default: false)
   --bandwidth-limit value              maximum bandwidth limit in bytes or use suffix K,M,G (default: "0")
   --help, -h                           show help

Here is an example of an imaging command in its simplest form:

 image -i E: -o OutputFolder2

In this command, the -i flag is used to specify the input source for the image command.

Here's a breakdown of the command:

  • image: This is the name of a command or script that is used to create an image (a copy) of a disk or volume.

  • -i E:: This flag specifies the input source for the image creation process. In this case, E: represents a disk or volume identifier on the system. It indicates that the image creation process should target the contents of the disk or volume associated with the drive letter E:.

  • -o OutputFolder2: This flag specifies the output destination for the image file. The image file generated by the command will be stored in the OutputFolder2 directory.

Imaging output and the metadata.yml file

To inspect the results of the command shown above, image -i E: -o OutputFolder2, we can navigate to the folder using interACT and list the contents as shown below:
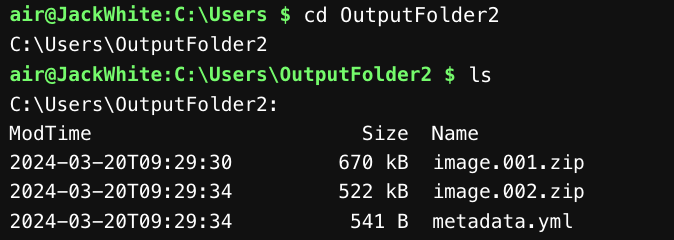
In this case, we see that there are two image chunks; image.001.zip and image.002.zip, along with a file named metadata.yml. This file exists in your output folder even when you use the AIR UI to image a disk or volume.

This metadata file can be read in the shell with the 'cat' command. It provides information about your image including the source, imaging start and end times, size, and hash values:
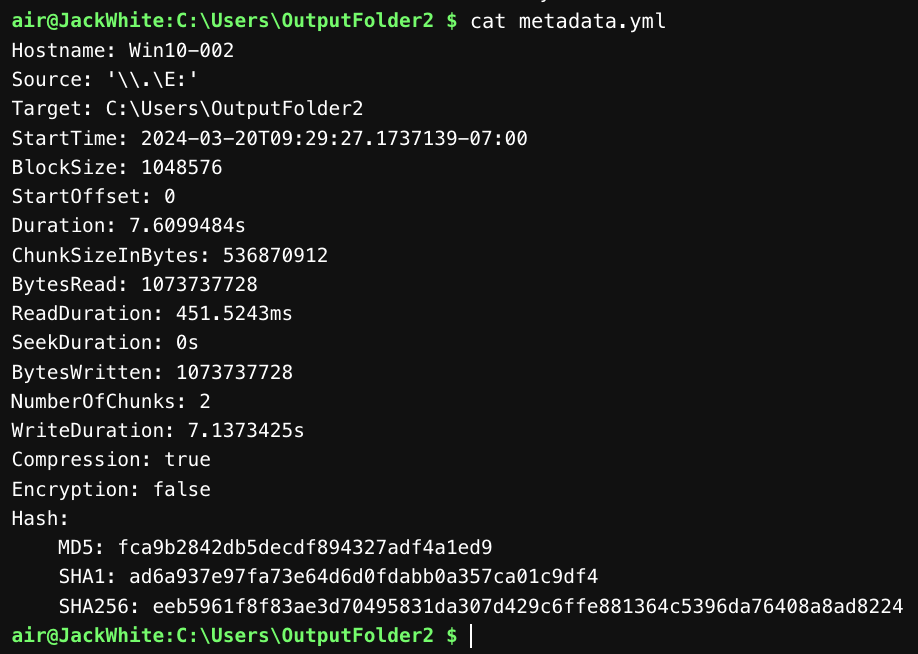
Understanding errors documented in the metadata.yml file

From time to time all imaging tools will have issues with areas of the the disk that can not be read. In such cases, AIR will report errors in the metadata.yml file and they will be recorded as shown below:

metadata:
    Hostname: Win10-002
    Source: '\\.\E:'
    Target: C:\Users\OutputFolder2
    StartTime: 2024-03-19T19:58:21.2390559-07:00
    BlockSize: 1048576
    StartOffset: 0
    Duration: 7.734205s
    ChunkSizeInBytes: 536870912
    BytesRead: 1073737728
    ReadDuration: 466.9625ms
    SeekDuration: 0s
    BytesWritten: 1073737728
    NumberOfChunks: 2
    WriteDuration: 7.249291s
    Compression: true
    Encryption: false
    Hash:
        MD5: fca9b2842db5decdf894327adf4a1ed9
        SHA1: ad6a937e97fa73e64d6d0fdabb0a357ca01c9df4
        SHA256: eeb5961f8f83ae3d70495831da307d429c6ffe881364c5396da76408a8ad8224
ReadErrorTable:
    Errors:
        0: error-1
        1: error-2
    Regions:
        - Offset: 0
          Size: 1048576
          RefError: 0
        - Offset: 2097152
          Size: 1048576
          RefError: 1

This imaging metadata report outlines the process and outcome of an imaging operation carried out in AIR. The report provides details about the operation, including the source, target, data transfer metrics, and errors encountered. Let's break down the key parts and interpret the errors mentioned in the report:

Basic Operation Details

  • Hostname: Win10-002 indicates the machine name where the operation was performed.

  • Source: '\.\E:' shows that imaging was done from a device mounted at E: (likely a disk drive).

  • Target: C:\Users\OutputFolder2 is where the imaged data was written.

  • StartTime: The operation started on March 19, 2024, at 19:58:21 local time.

  • Duration: It took approximately 7.73 seconds to complete.

  • Compression: Enabled, indicating the data was compressed during the imaging process.

  • Encryption: Not used during this imaging operation.

Data Transfer Metrics

  • BytesRead and BytesWritten: Both are 1,073,737,728 bytes, indicating that a bit over 1 GB of data was read from the source and written to the target.

  • NumberOfChunks: 2 chunks of data were processed, aligning with the bytes read/written and chunk size.

  • ChunkSizeInBytes: Each chunk was 536,870,912 bytes, about 512 MB, which fits the total data size indicating two chunks were necessary.

  • ReadDuration and WriteDuration: Reading took under half a second, whereas writing took the majority of the operation time (about 7.25 seconds).

Errors and Their Implications

The ReadErrorTable section is particularly noteworthy as it outlines issues encountered during the read operation:

  • Errors Listed: Two errors, error-1 and error-2, were encountered during the imaging process.

  • Regions Affected:

    • The first error occurred at the very beginning of the read operation (Offset: 0), affecting 1,048,576 bytes (1 MB).

    • The second error occurred after skipping the next 1 MB chunk (notably absent from the errors), affecting the third 1 MB segment of data (Offset: 2,097,152).

Interpreting the Errors

  • The presence of read errors in specific regions suggests issues with the source device at those locations. This could be due to bad sectors, physical damage, or corruption within the disk's storage.

  • The operation continued despite these errors, which is common in forensic imaging processes where the goal is to recover as much data as possible, even in the presence of damaged or inaccessible areas.

  • The absence of errors for the second 1 MB segment (from 1,048,576 to 2,097,152 bytes) indicates that not all regions of the source had issues, highlighting the localized nature of the problems.

PreviousDisk and Volume ImagingNextChain Of Custody in AIR

Last updated 1 year ago

Was this helpful?

Imaging output and associated metadata file
Contents of metadata.yml read with 'cat' command