Task Creation
Introduction to Task Creation in AIR
Section titled “Introduction to Task Creation in AIR”Tasks in AIR are operations assigned to assets via the AIR console, either manually or automatically through triggers. Each task can comprise multiple ‘tasking assignments,’ where a single task on one asset is a ‘tasking assignment,’ but the term ‘task’ can also describe the same tasking assignment across many assets. These tasks facilitate various operational needs and can be categorized into three types:
Types of Tasks
Section titled “Types of Tasks”- Manual Tasks:
- These are assigned manually by users directly through the AIR console.
- Scheduled Tasks:
- Created by users to commence at a future time. Scheduled tasks can be one-time events or recurring at daily, weekly, or monthly intervals.
- Triggered Tasks:
- Automatically assigned to assets in response to trigger requests from integrated SIEM, SOAR, or EDR solutions.
Tasks enhance operational efficiency by allowing flexible and automated responses to various cybersecurity scenarios, ensuring that your assets are continually monitored and managed effectively.
Activities that Generate Tasking Assignments
Section titled “Activities that Generate Tasking Assignments”In AIR, tasking assignments are generated by various activities that target asset operations, including:
- Data Acquisition:
- Initiating the collection of digital evidence from an asset. This can be a comprehensive acquisition or targeted to specific evidence types.
- Hunt/Triage:
- Running predefined or custom rules (YARA, Sigma, osquery) to identify suspicious activities or indicators of compromise on the assets.
- interACT Sessions:
- Establishing a secure remote shell session to manually investigate and interact with the asset in real-time.
- Baseline Acquisition and Comparison:
- Running comparisons to detect deviations from a predefined baseline state of the asset and acquiring baseline data.
- Disk/Volume Imaging:
- Capturing the complete state of disks or volumes for comprehensive forensic analysis.
- Auto Tagging:
- Automatically tagging assets based on predefined criteria for easier management and identification.
- Calculating Hash:
- Generating hash values for files to ensure data integrity and assist in identifying duplicate or tampered files.
- Offline Acquisition and Offline Hunt/Triage:
- Performing data acquisition and triage on assets that are not connected to the network.
Administrative Tasks
Section titled “Administrative Tasks”Some more ‘administrative’ activities also generate tasking assignments and these include:
- Shutdown, Reboot, and Uninstall:
- Remotely managing the power state and software configuration of assets.
- Isolation:
- Isolating an asset from the network to prevent further compromise.
- Responder Deployment:
- Deploying response tools to the asset for immediate action.
- Purge Local Data and Retry Upload:
- Managing data on the asset, including purging local data and retrying data uploads.
- Migration and Version Update:
- Migrating data between systems and updating software versions.
- Log Retrieval:
- Collecting logs for further analysis and troubleshooting.
By understanding and utilizing these task types, users can streamline their incident response and investigation workflows, improving overall security posture and response times.
Tasks are saved at the organization level and can be reviewed comprehensively by navigating to the main AIR menu > Tasks:
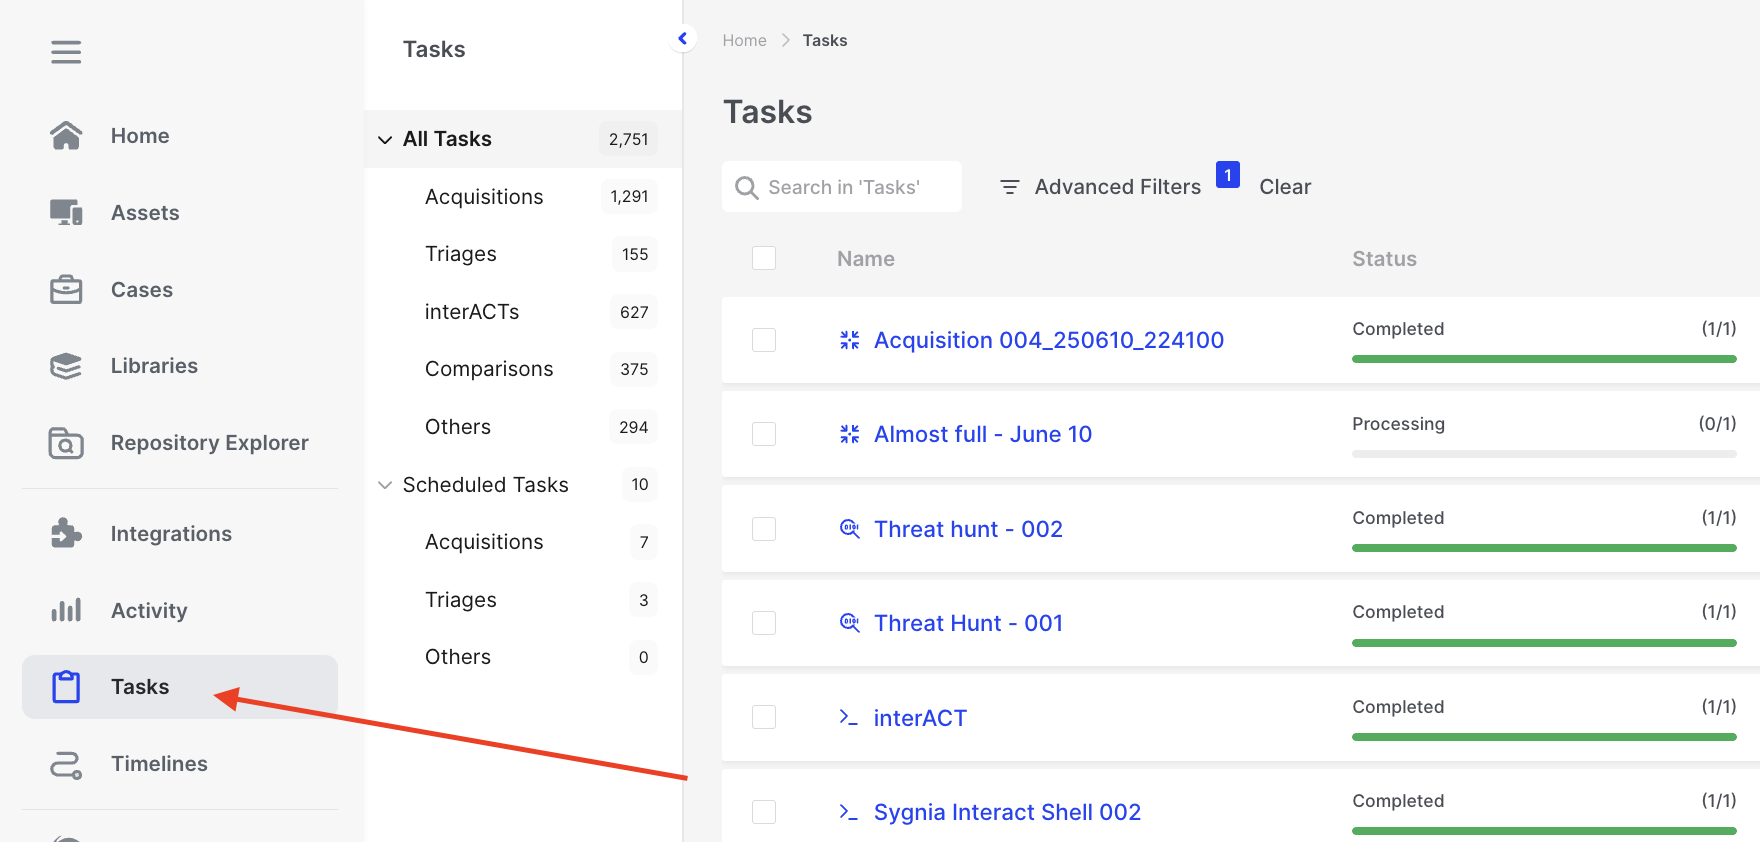
Task Creation: Where to review all organization tasks
Individual tasking assignments (one task on one asset) for an asset can also be reviewed by visiting the specific asset. From the secondary menu, you can select “All Tasks” or utilize the filtered tasks view to focus on specific task types.
Let’s now take a look at how to create a Task in AIR
Starting an Acquisition
Section titled “Starting an Acquisition”There are two primary ways to begin an acquisition task in AIR:
Quick Start Action Button
Section titled “Quick Start Action Button”The Quick Start action button in the top navigation bar provides rapid access to common actions. The Acquire Evidence option now expands into a submenu offering three distinct acquisition paths:
- From Device — Acquire evidence directly from connected assets in your fleet
- From Disk Image — Acquire evidence from uploaded disk images (New)
- From Cloud — Acquire evidence from cloud sources (Coming Soon)
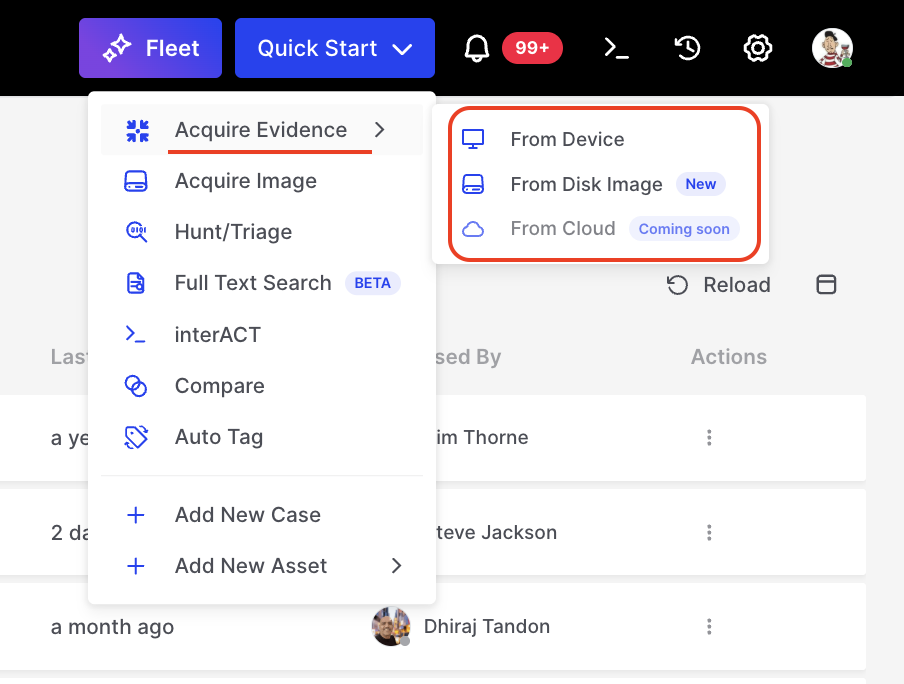
Task Creation: The Quick Start Action Button
This menu structure guides analysts toward the appropriate evidence acquisition path based on the investigative context—whether targeting live devices, forensic images, or cloud environments.
From the Assets Page
Section titled “From the Assets Page”Alternatively, you can initiate acquisition tasks directly from the Assets page by selecting one or more assets and using the action buttons. This approach is ideal when you have already identified specific assets to investigate.
Step 1 - Assets
Section titled “Step 1 - Assets”Select the Asset(s) on which you wish to execute tasks - In the example below we will Acquire Evidence from an asset named JackWhite:
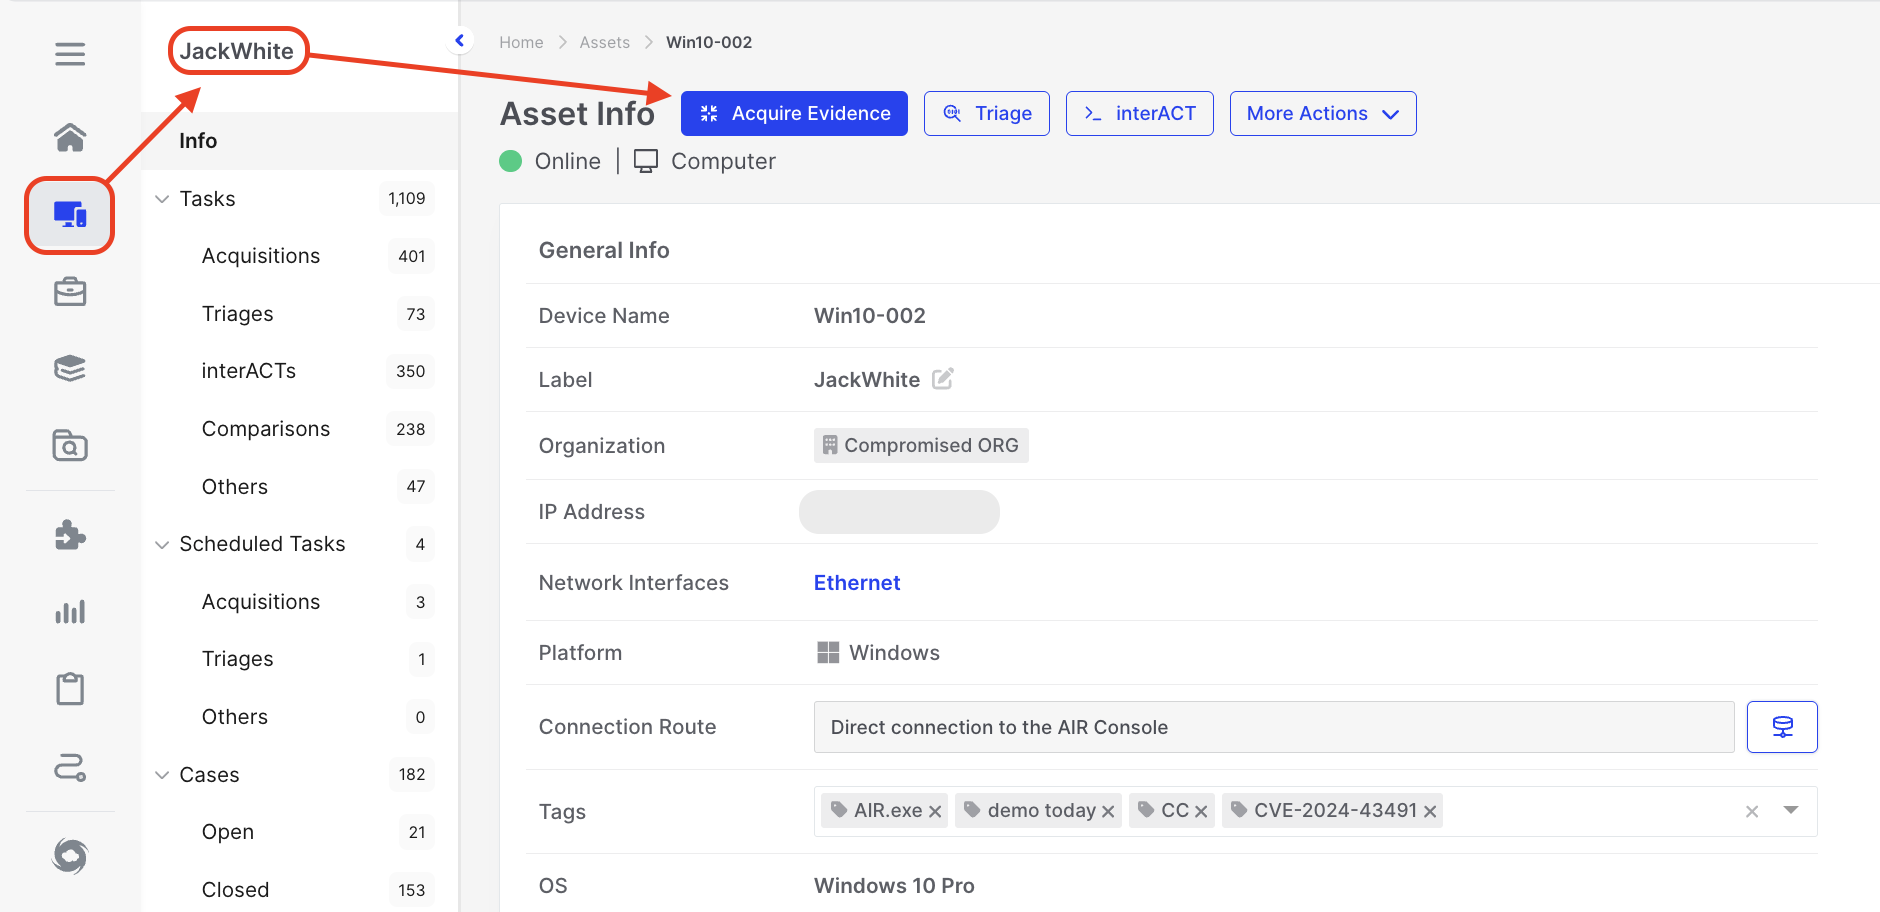
Task Creation: The Acquire Evidence Action Button selected for the asset JackWhite
The Bulk Action Bar will be available if you choose more than one asset:

Task Creation: The Bulk Action Bar indicating 2 assets selected
Step 2 - Setup
Section titled “Step 2 - Setup”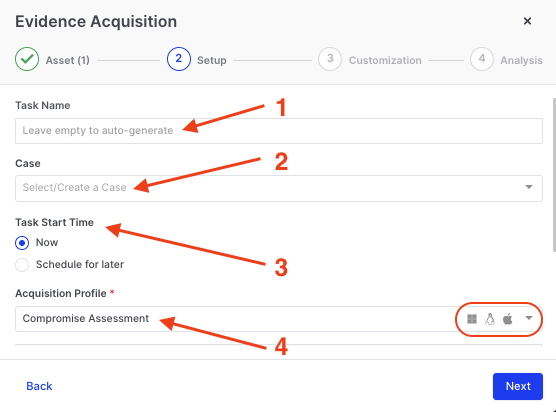
Task Creation: Step 2 - Setup
- Optionally specify a Task Name. If left blank, one will be automatically generated based on the task type, sequence number, and date/time.
- Allocate the task to a Case. This is important if you need to build a case for an ongoing investigation and you plan to investigate this asset further or other assets as part of the same investigation. All investigation activity can be recorded within Cases. A Case can be thought of as a container into which activity for a particular investigation can be grouped, making Incident Response management and investigations easier, especially as the Case will also be presented in the Investigation Hub.
- Select Now as a Task Start Time to execute the task immediately.
- Choose an Acquisition Profile (e.g., Compromise Assessment, Full Acquisition, etc). We offer many ‘out of the box’ profiles, but you can also create and save your own as needed.
Step 3 - Customization
Section titled “Step 3 - Customization”This step allows you to apply the existing organizational policy or, if you have the appropriate privileges, customize the following settings:
- Specify where the collected evidence should be saved. You can choose a local path on the asset—configurable per operating system—or direct the collection to an external evidence repository.
- Optionally apply resource limits—including CPU, bandwidth, and disk space—to the task assignment to minimize potential impact on the asset.
- Enable compression and encryption to be applied to the collected evidence.
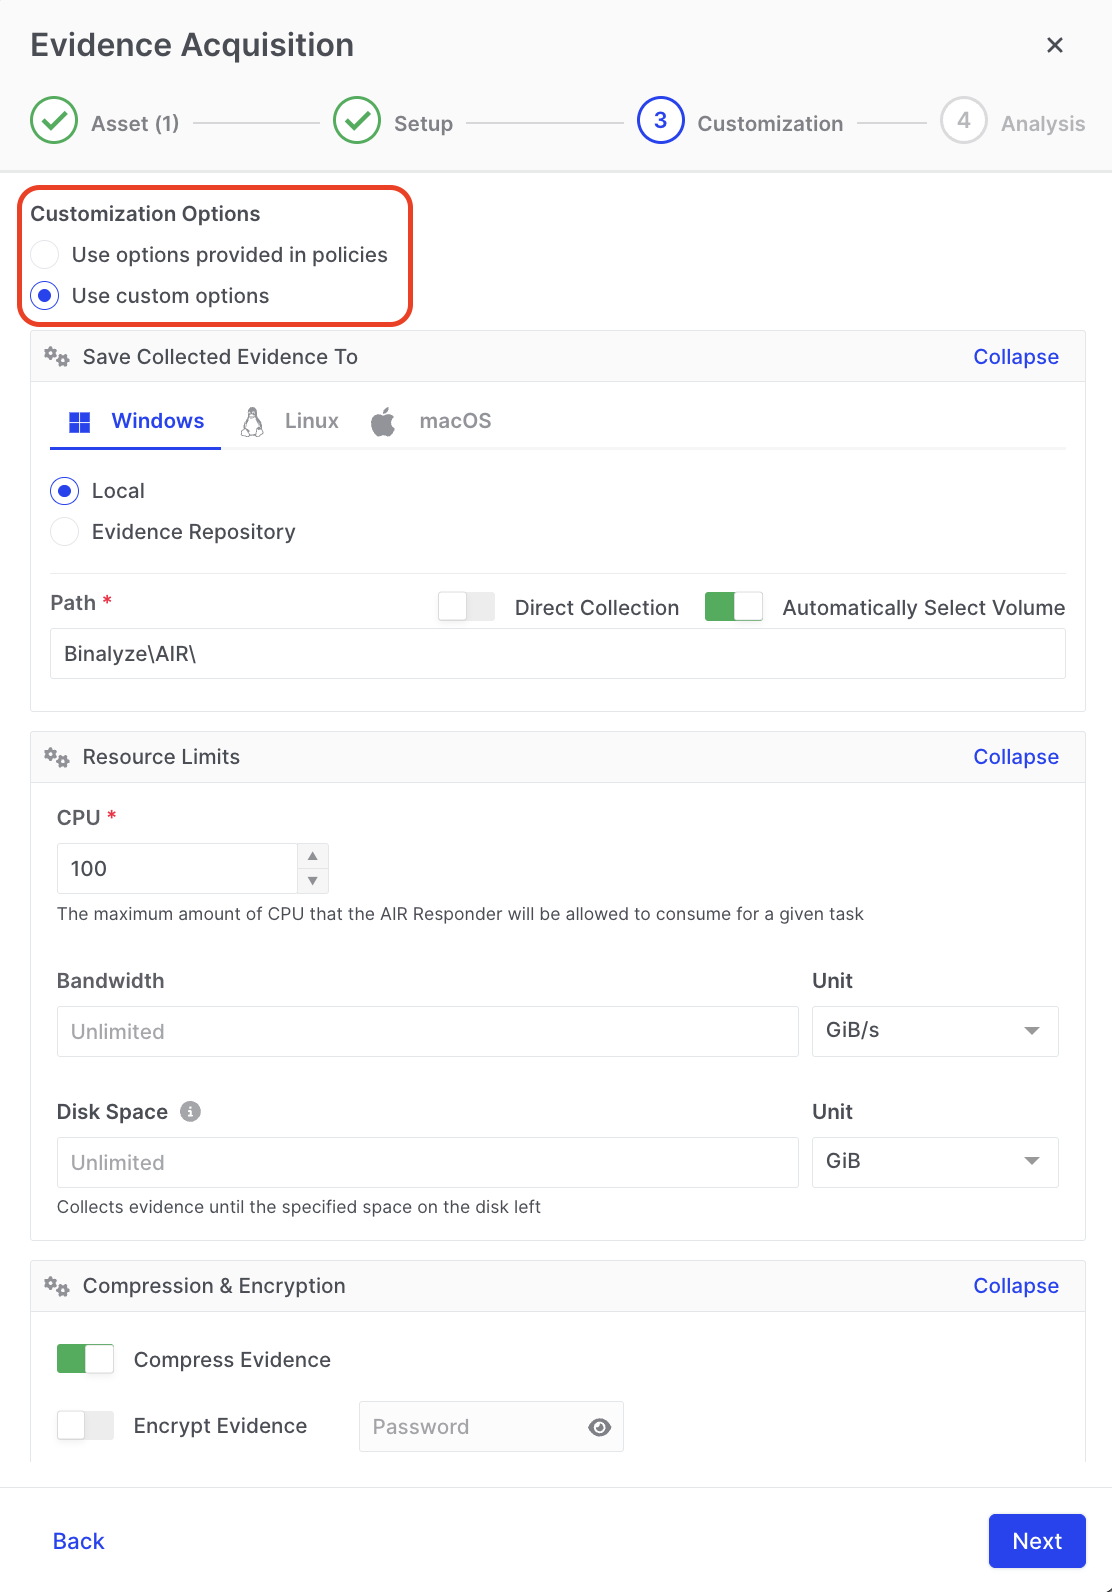
Task Creation: Customization of options
Step 4 - Analysis
Section titled “Step 4 - Analysis”In this final step, you can choose to enable or disable the automated DRONE and MITRE ATT&CK analyzers.
We strongly recommend keeping both enabled—they have minimal impact on system resources and provide prioritized threat intelligence to help accelerate your investigations. The MITRE ATT&CK analyzer runs directly on live assets and, when combined with other analyzers, enables immediate identification of potentially compromised systems. This streamlines your workflow by helping you focus on the most critical areas first.

Task Creation: Toggle options for DRONE, MITRE ATT&CK and AIR analyzers
Keyword Searches
Section titled “Keyword Searches”Step 4, ‘Analysis’, also provides the option to add individual keywords or upload keyword list files.
This enables DRONE to perform targeted searches, helping investigators conduct more focused and efficient analysis within their evidence collections.
Keyword Lists Features:
- No character limit for keyword lists, but a 1 MB file size limit applies.
- Each keyword must be on a new line for proper search functionality.
- Keyword searches are limited to data within the Case.db (excluding CSV files).
- Keyword searches are supported by regex, read more here: Regex in AIR
- This search functionality extends to event log data collected by Sigma analyzers, including:
- Windows: Event Record Analyzer
- Linux: Syslog Analyzer
- macOS: Audit Event Analyzer
This feature offers investigators greater flexibility and precision in their searches, significantly enhancing DRONE’s capabilities. Regex support will be added soon in an upcoming release.
The results of all tasks—and their associated reports—are accessible via the Investigation Hub.
Section titled “The results of all tasks—and their associated reports—are accessible via the Investigation Hub.”Links to these reports within the Investigation Hub can be found in the following three locations::
- Tasks, via the main menu.
- The page for the individual Asset > Acquisitions.
- And finally, Case Acquisitions, if the task is sent to a Case.
1) Accessing the Tasks via the main menu:
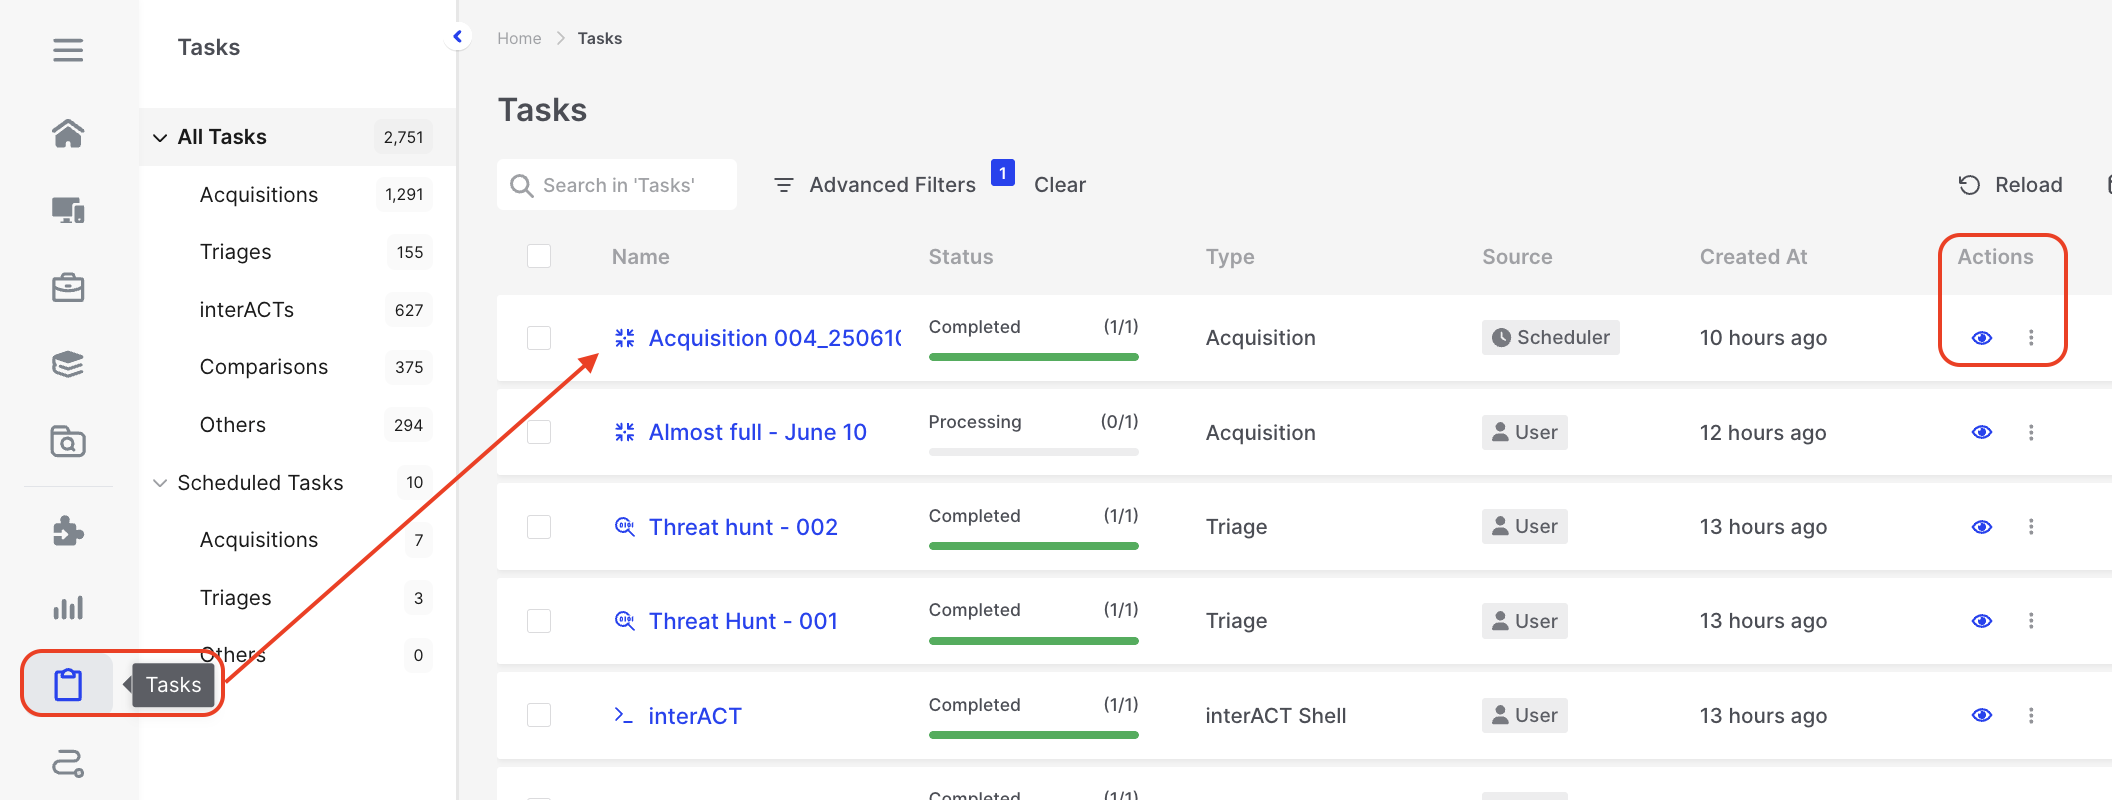
Task Creation: Accessing the Task report via Tasks in the main menu
Clicking the ‘eye’ icon in the Actions column opens the Task Details view, where you can access the data associated with the acquisition task via the link to the Investigation Hub.
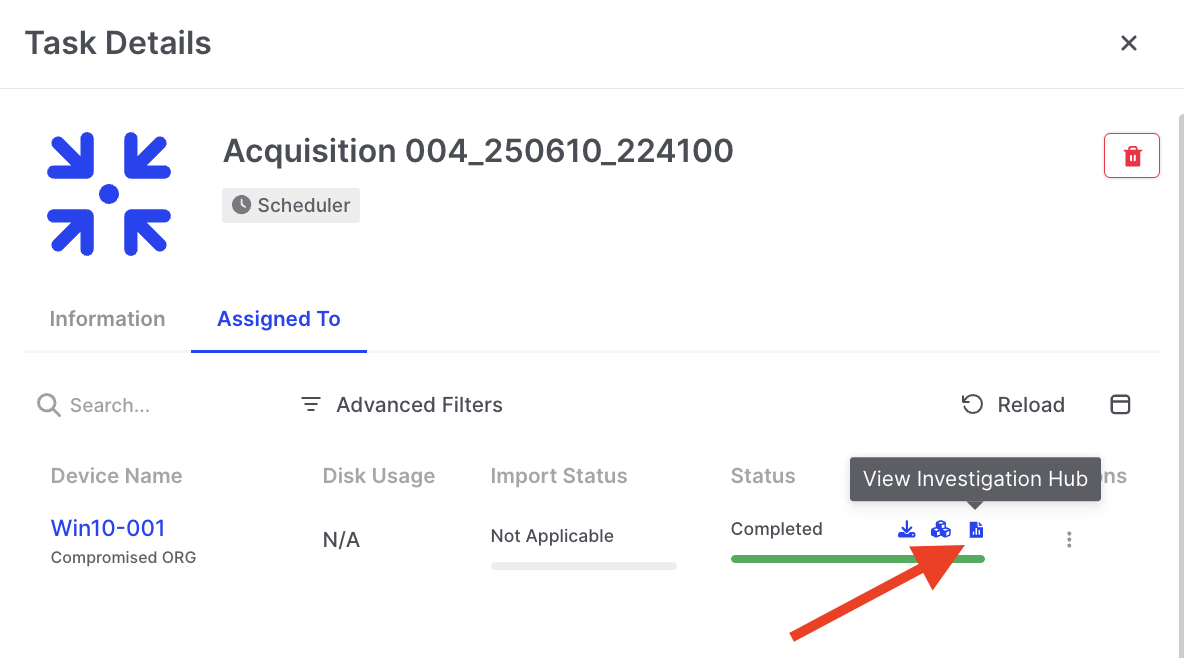
Task Creation: Accessing the Task report via Task Details
2) Below we see a report being accessed from the Assets menu:
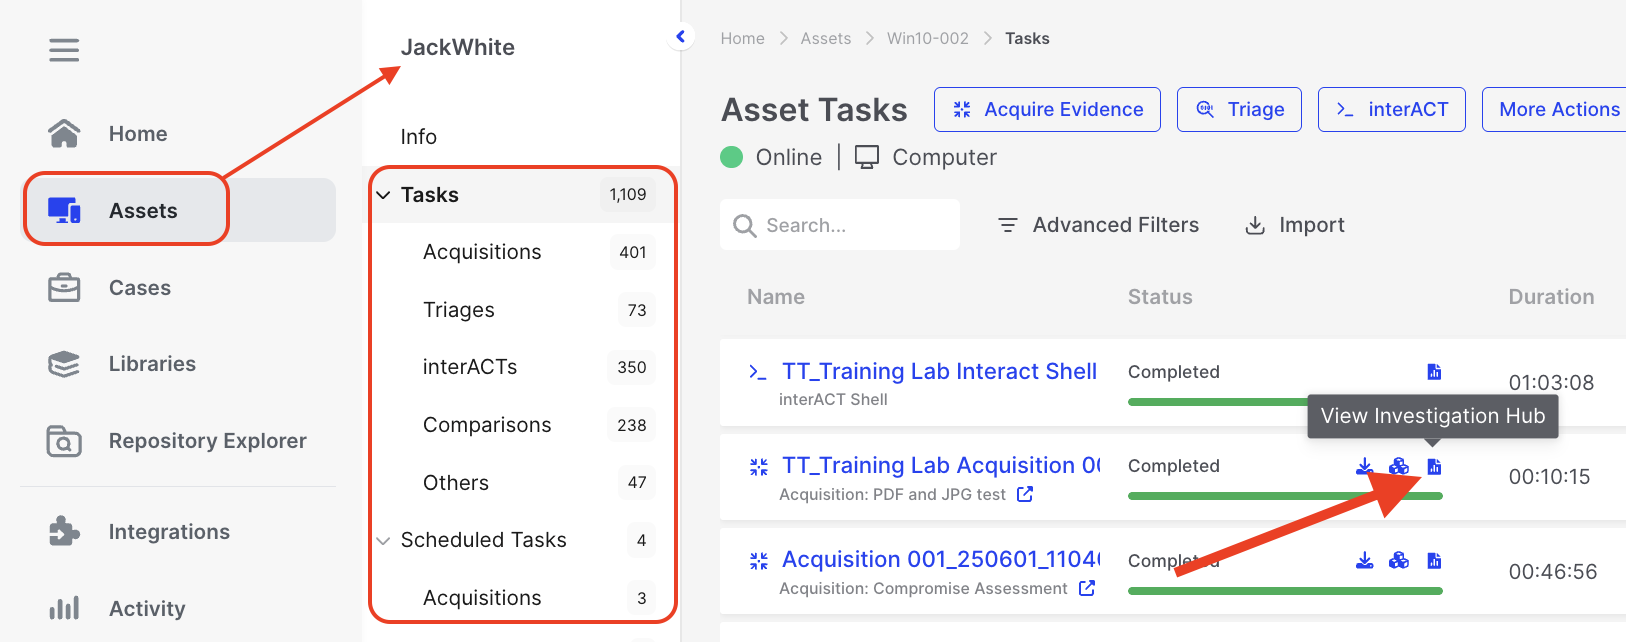
Task Creation: Accessing the Task report via the Assets menu
3) And finally a report from the Case Acquisition page but only if you have sent it here:
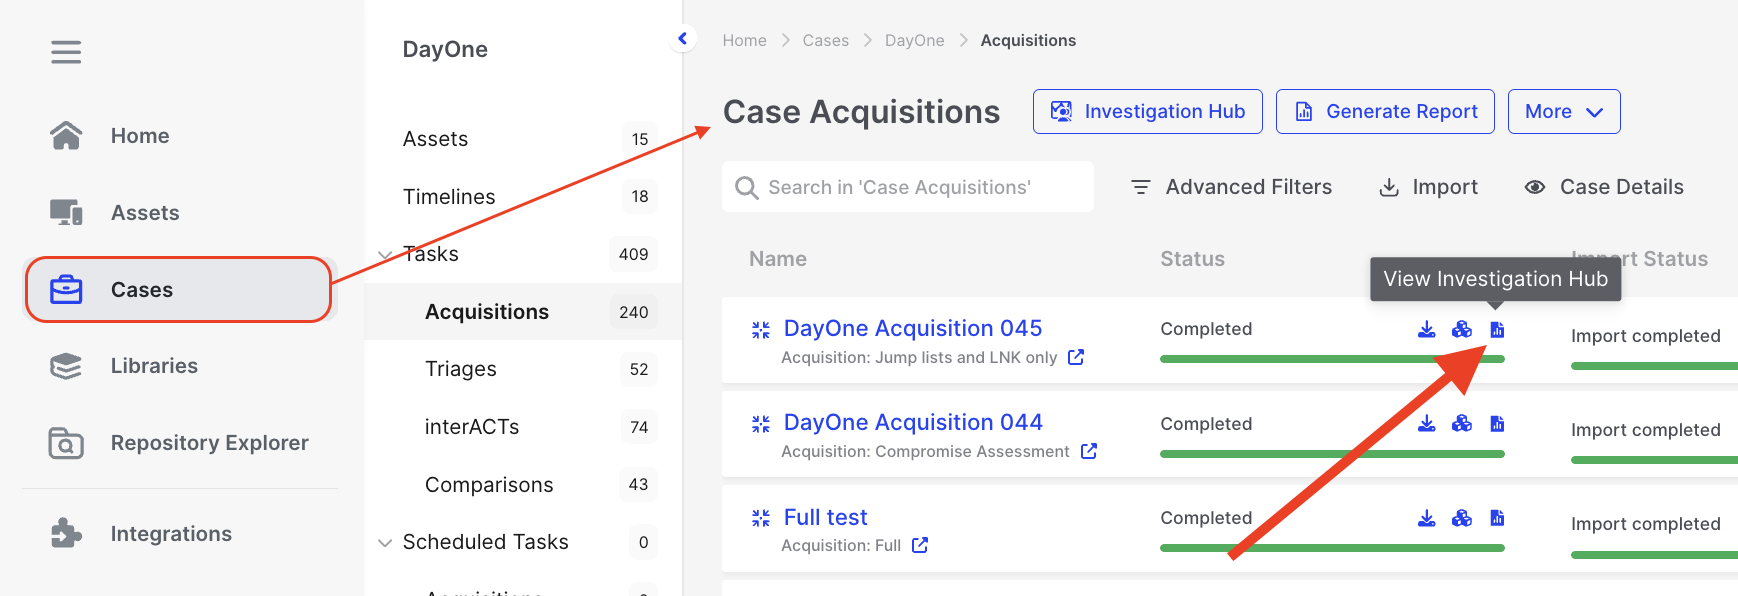
Task Creation: Accessing the Task report via the Cases menu