macOS Disk Imaging
Executive Summary
Section titled “Executive Summary”Apple’s APFS file system uses a shared-container architecture. This has important implications for forensic imaging:
- You can only obtain a forensically sound macOS image by acquiring an entire APFS container.
- It is not possible to acquire a usable APFS volume-level image, because APFS volumes do not contain the full metadata required to stand alone.
- This applies to Intel and Apple Silicon systems, encrypted and unencrypted APFS, and all imaging tools including AIR and
dd.
Understanding APFS Forensic Imaging
Section titled “Understanding APFS Forensic Imaging”APFS containers host multiple volumes that share critical metadata:
- Object maps
- Checkpoints and snapshots
- Allocation tables
- Encryption state
Because APFS volumes cannot function independently, volume-only images cannot be mounted or parsed. Forensically valid macOS imaging requires acquiring an entire APFS container.
System Integrity Protection (SIP)
Section titled “System Integrity Protection (SIP)”macOS includes a security technology called System Integrity Protection (SIP). This technology restricts user access to certain folders and processes to protect the operating system from malicious software.
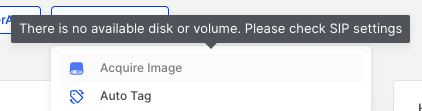
macOS Disk Imaging: AIR Console warning when SIP is enabled
Disabling SIP
Section titled “Disabling SIP”To proceed with acquiring a disk image, SIP must be disabled. This requires booting the Mac into Recovery Mode. The method to access Recovery Mode varies depending on whether the Mac is Intel-based or Apple Silicon-based.
For Intel-based Macs
Section titled “For Intel-based Macs”- Restart your Mac.
- Immediately press and hold Command-R until you see the startup screen.
- If you see a lock, enter the password for your Mac.
For Apple Silicon Macs
Section titled “For Apple Silicon Macs”- On your Mac, choose Apple menu > Shut Down.
- Press and hold the power button on your Mac until the system volume and the Options button appear.
- Click the Options button, then click Continue.
Disabling SIP via Terminal
Section titled “Disabling SIP via Terminal”Once in Recovery Mode:
- Select Terminal from the Utilities menu.
- Enter the following command:
csrutil disable- After successfully disabling SIP, restart the machine.
You should now see that the warning in the AIR Console has disappeared, allowing you to assign a disk image acquisition task to the responder.
Acquiring a Disk Image on macOS
Section titled “Acquiring a Disk Image on macOS”What You Can Do with AIR
Section titled “What You Can Do with AIR”Full APFS Container Imaging (Supported)
Section titled “Full APFS Container Imaging (Supported)”AIR can acquire a full, block-level image of the physical disk (capturing the APFS container) once SIP is disabled. A full-container image:
- Contains all APFS metadata and structure
- Is accepted by APFS-aware forensic tools
- Can be used directly inside AIR
This is the correct and only method for creating a forensically sound image of an APFS container.
APFS Volume-Level Imaging (Not Possible)
Section titled “APFS Volume-Level Imaging (Not Possible)”AIR, like all forensic tools, cannot produce a valid standalone image of an APFS volume. Volume images:
- Cannot be mounted
- Cannot be parsed
- Are not forensically useful
Disk Tab vs Volume Tab
Section titled “Disk Tab vs Volume Tab”When you select the Acquire Image task, you are presented with two tabs: Disk and Volume.
Disk Tab
Section titled “Disk Tab”The Disk tab (as seen below) displays entries that represent the system’s physical disks or virtual disk devices. APFS containers reside inside these disks, not at the same level.
Best forensic choice (The most common case)
On almost all APFS Macs: rdisk0 is the actual physical internal SSD
All other rdisk entries (rdisk1–rdisk4) are synthesized or virtual devices (APFS Preboot stores, VM stores, snapshots, container-derived devices, or disk images mounted in the OS)
Therefore, in most cases, to get a complete, integrity-preserving image you should acquire: /dev/rdisk0 — the full physical disk
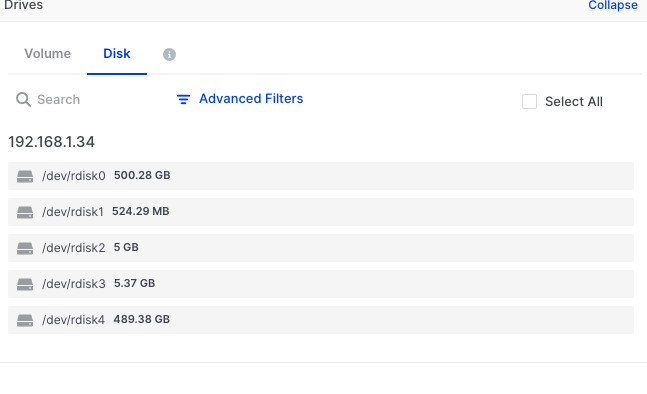
macOS Disk Imaging: APFS disk view showing available physical disks
Images acquired from the Disk tab for APFS containers can be mounted and verified as accessible file systems.
Identifying the Correct APFS Container
Section titled “Identifying the Correct APFS Container”macOS systems—particularly Apple Silicon Macs—often contain multiple APFS containers on a single physical disk. These may include separate containers for system recovery, preboot, and virtual machine storage, in addition to the primary system container.
For forensic purposes, the container of interest is typically the largest one, which houses the Macintosh HD system volume and the associated Data volume containing user files. In the AIR Disk tab, this is usually represented by the primary physical disk entry (e.g., /dev/rdisk0). Examiners should verify the container contents after acquisition to confirm they have captured the intended system and user data.
Volume Tab
Section titled “Volume Tab”The Volume tab displays individual volumes. For APFS volumes, acquisition from this tab will fail due to the container architecture limitations.
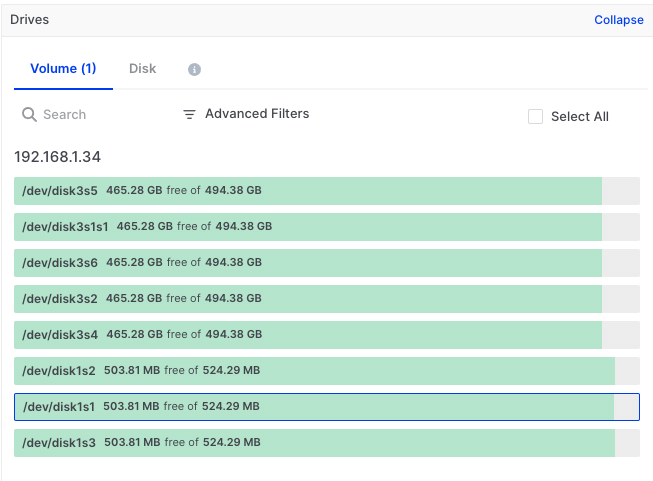
macOS Disk Imaging: Volumes tab showing available volumes
Attempting to acquire an APFS volume image results in an error:
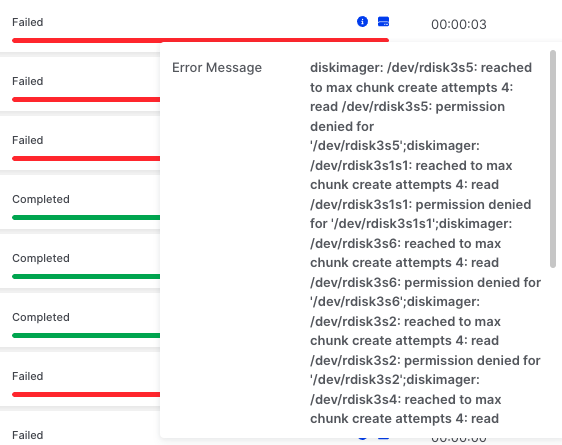
macOS Disk Imaging: Volume imaging fails due to APFS architecture
Verifying a Successful Acquisition
Section titled “Verifying a Successful Acquisition”After acquiring a full APFS container image, you can verify the image by mounting it in a forensic tool or within AIR.
macOS Disk Imaging: Test the mounted image to verify acquisition success
File System Support and Expected Outcomes
Section titled “File System Support and Expected Outcomes”The following table summarises acquisition behaviour across different file systems:
| File System | Disk Tab | Volume Tab | Image Usability |
|---|---|---|---|
| APFS | ✅ Supported | ❌ Not possible | Usable (full container only) |
| APFS (Encrypted) | ✅ Supported | ❌ Not possible | Usable (full container only) |
| APFS (Case-Sensitive) | ✅ Supported | ❌ Not possible | Usable (full container only) |
| APFS (Case-Sensitive, Encrypted) | ✅ Supported | ❌ Not possible | Usable (full container only) |
| Mac OS Extended (HFS+) | Does not appear | ✅ Supported | Usable |
| Mac OS Extended (Case-Sensitive) | Does not appear | ✅ Supported | Usable |
| MS-DOS (FAT) | Does not appear | ✅ Supported | Often not usable |
| ExFAT | Does not appear | ✅ Supported | Often not usable |
Working With APFS Images
Section titled “Working With APFS Images”A full APFS container image acquired via AIR can be:
- Mounted in forensic tools
- Processed by AIR
- Parsed by APFS libraries
It contains snapshots, deleted artifacts, system and user data, and full filesystem structure.
Recommended Workflow
Section titled “Recommended Workflow”- Disable SIP via Recovery Mode
- Acquire an APFS container from the Disk tab
- Validate hashes to confirm integrity
- Mount/import image in your forensic tool
- Analyse the complete APFS dataset