LogoLogo
Back to binalyze.com
  • Welcome | Binalyze Knowledge Base
  • AIR
    • AIR
    • Introduction
      • What is AIR?
      • Terminology
      • Architecture
        • AIR Responder Architecture; overview and performance analysis
        • AIR Task Flow and Management
      • Network Communication
      • Cloud Forensics with Binalyze AIR
    • AIR Setup
      • Console Hardware Requirements
      • Console Pre-Installation
      • Console Installation
      • Microsoft Azure Cloud Platform Integration
      • AIR Relay Server
        • What is AIR Relay Server?
        • Requirements for installation
        • How to install a Relay Server on different Linux platforms
        • How to change IP address of Relay Server
        • How to install a Responder with Relay Server support
        • Proxy configurations
          • Adding proxy to Relay Server
          • Adding proxy to Responder
        • Service Management for Relay Server
        • Whitelisting for Relay Server
        • Retrieving metrics from Relay Server
        • Updating and Uninstalling Relay Server
        • Troubleshooting
      • AIR Responder - Supported Operating Systems
        • AIR Responder - MS Windows supported systems
        • AIR Responder - Apple macOS supported systems
        • AIR Responder - Linux (DEB/RPM) supported systems
        • AIR - ESXi Standalone Collector
        • AIR Responder - Chrome supported systems
          • AIR For Chrome
      • AIR Responder Hardware Requirements
      • AIR Responder Deployment
        • Golden Image
        • Responder & Active Directory OUs
        • AIR Responder Exception Rules
          • Binalyze AIR Watchdog Folder
        • FDA via Jamf and Apple’s PPPC utility
        • AIR Responder in Windows 'Safe Mode'
      • Uninstalling AIR Responders
      • Security
        • AIR Console Access Control
        • AIR SSL Enforcement
          • SSL Certificate Management in Binalyze AIR
        • Two-factor authentication (2FA)
      • Post-Deployment Configuration Guide
        • Using AIR CLI on Binalyze AIR Console
      • AIR's User Settings
    • Updating AIR
      • Single-Tier Systems
      • 2-Tier Systems
      • AIR Console Updating - SaaS
    • Backup
      • Restore AIR Backup using the CLI
    • Features
      • Acquisition
        • Task Creation
          • Regex in AIR/DRONE:
          • Asset Management with Persistent Saved Filters
          • Task Cancellation and Deletion
        • Acquisition Profiles
        • Supported Evidence
          • Windows Collections
          • macOS Collections
          • Linux Collections
          • IBM AIX Collections
        • Scheduling Tasks
        • Disk and Volume Imaging
          • Imaging with interACT
        • Chain Of Custody in AIR
      • Auto Tagging
      • Triage
        • Triage Rule Templates
          • YARA Templates
          • Sigma Templates
          • osquery Templates
        • Schedule Triage Tasks
      • interACT
        • interACT Commands
        • PowerShell commands in interACT
      • Compare
      • Timeline
      • Integrations
        • SSO Integrations
          • Microsoft Azure SSO Integration
          • Okta SAML 2.0 SSO Integration
        • Webhooks
          • Mattermost Integration
          • Splunk Integration
          • IBM QRadar Integration
          • Wazuh Integration
          • Cortex XSOAR Integration
          • Elasticsearch Logstash Kibana Integration
          • ServiceNow Integration
          • Sumo Logic Integration
          • Crowdstrike Integration
          • Microsoft Sentinel Integration
          • Slack Integration
          • Carbon Black Cloud Integration
          • Rapid7 InsightIDR Integration
          • LogicHub SOAR (DEVO) Integration
          • Fortigate SIEM Integration
          • Dynatrace Integration
          • Stellar XDR Integration
          • SentinelOne Integration
          • Microsoft 365 Defender Integration
          • Cisco XDR Integration
      • Event Subscription
      • AIR API
        • API in AIR is likely to be more effective than Webhooks
      • DRONE
        • What is DRONE?
        • What is an Analysis Pipeline?
        • Analyzers
          • Cross Platform Analyzers
            • MITRE ATT&CK Analyzer
              • MITRE ATT&CK Analyzer changelog
            • Dynamo Analyzer
            • Browser History Analyzer
            • Generic WebShell Analyzer
          • Windows Analyzers
            • Windows Event Records and how AIR handles them
              • Windows Event Logs in AIR v4.21 and older versions
              • Event Records Summary vs. Event Records
            • Prefetch Analyzer
            • Shellbag Data Fields
          • Linux Analyzers
          • macOS Analyzers
            • Audit Event Analyzer
      • AIR Investigation Hub
        • Using the AIR Investigation Hub
        • Investigation Hub – Data Usage Statistics Dashboard
      • AIR File Explorer
        • File Explorer - FAQs
      • Tornado (Preview Version)
        • Tornado Installation Guide
          • Tornado Operating System Support
        • Updating Tornado
        • Tornado demo video
        • Getting Started with Tornado
          • Tornado Terminology
        • Tornado Collectors
          • Accessing Google Workspace
            • Service Account Creation
              • Enable Service Account Key Creation
          • Access Modes in O365
            • O365 license types
        • Tornado Troubleshooting & Feedback
        • Tornado FAQs
      • Frank.AI
      • Asset Isolation
      • Evidence Repositories
      • Policies
      • Tags
      • Off-Network Responder
        • Setting Up a Custom Case Directory
        • biunzip
          • biunzip password file
      • Binalyze AIR Responder Proxy Support
      • Proxy Configuration on Binalyze AIR Console
      • Binalyze AIR Audit Logs
    • Troubleshooting
      • Binalyze AIR Console CPU Profiling for Performance Issues
      • Understanding MSI Error Code 1618
      • How to gather Binalyze AIR logs for Troubleshooting
        • Collecting Binalyze AIR Console Log Files
        • Collecting Binalyze AIR Responder Log Files
        • Collecting Binalyze AIR Off-Network Responder Log Files
    • FAQs
      • Binalyze AIR Console Migration Procedure For Single-Tier Setup
      • Binalyze AIR Console Migration Procedure For 2-Tier Installation
      • Binalyze AIR Console Backup Procedure
      • Resolving the “Invalid Host Header. Host must be the Console Address” Error
      • How to download the collected evidence and artifacts in Binalyze AIR?
      • How to gather Binalyze AIR logs for Troubleshooting
        • Collecting Binalyze AIR Console Log Files
        • Collecting Binalyze AIR Responder Log Files
        • Collecting Binalyze AIR Off-Network Responder Log Files
      • AIR responder troubleshooting
      • Understanding Port Usage in Binalyze AIR
      • How many assets can connect to a single Console instance?
      • How do I enable SSL on AIR?
      • Can I use AIR with EDR/XDR Products?
      • Can I integrate AIR with my SOAR/SIEM?
      • What (sub)domains are used by AIR?
      • Docker & Host System IP Conflict
      • Monitoring Responder and UI API's
      • How do I update AIR Console?
      • How do I update AIR Responders on assets?
      • How to reset the password of a user via the AIR-CLI?
      • Is there a way to move an asset from one Organization or Case to another?
      • Creating exclusions/exception rules for Binalyze AIR Responder on EPP and EDR Solutions
      • Anything missing?
      • How can I install a version of AIR that isn't the latest?
  • General
    • Licenses - Open-source Software List
Powered by GitBook
On this page

Was this helpful?

Export as PDF
  1. AIR
  2. Features
  3. Integrations
  4. SSO Integrations

Okta SAML 2.0 SSO Integration

Setting up Okta for AIR (Available from AIR 4.1)

PreviousMicrosoft Azure SSO IntegrationNextWebhooks

Last updated 7 months ago

Was this helpful?

  1. Sign in to the Okta Admin Dashboard.

  2. Click the “Applications” button in the left menu.

  3. Click Create App Integration.
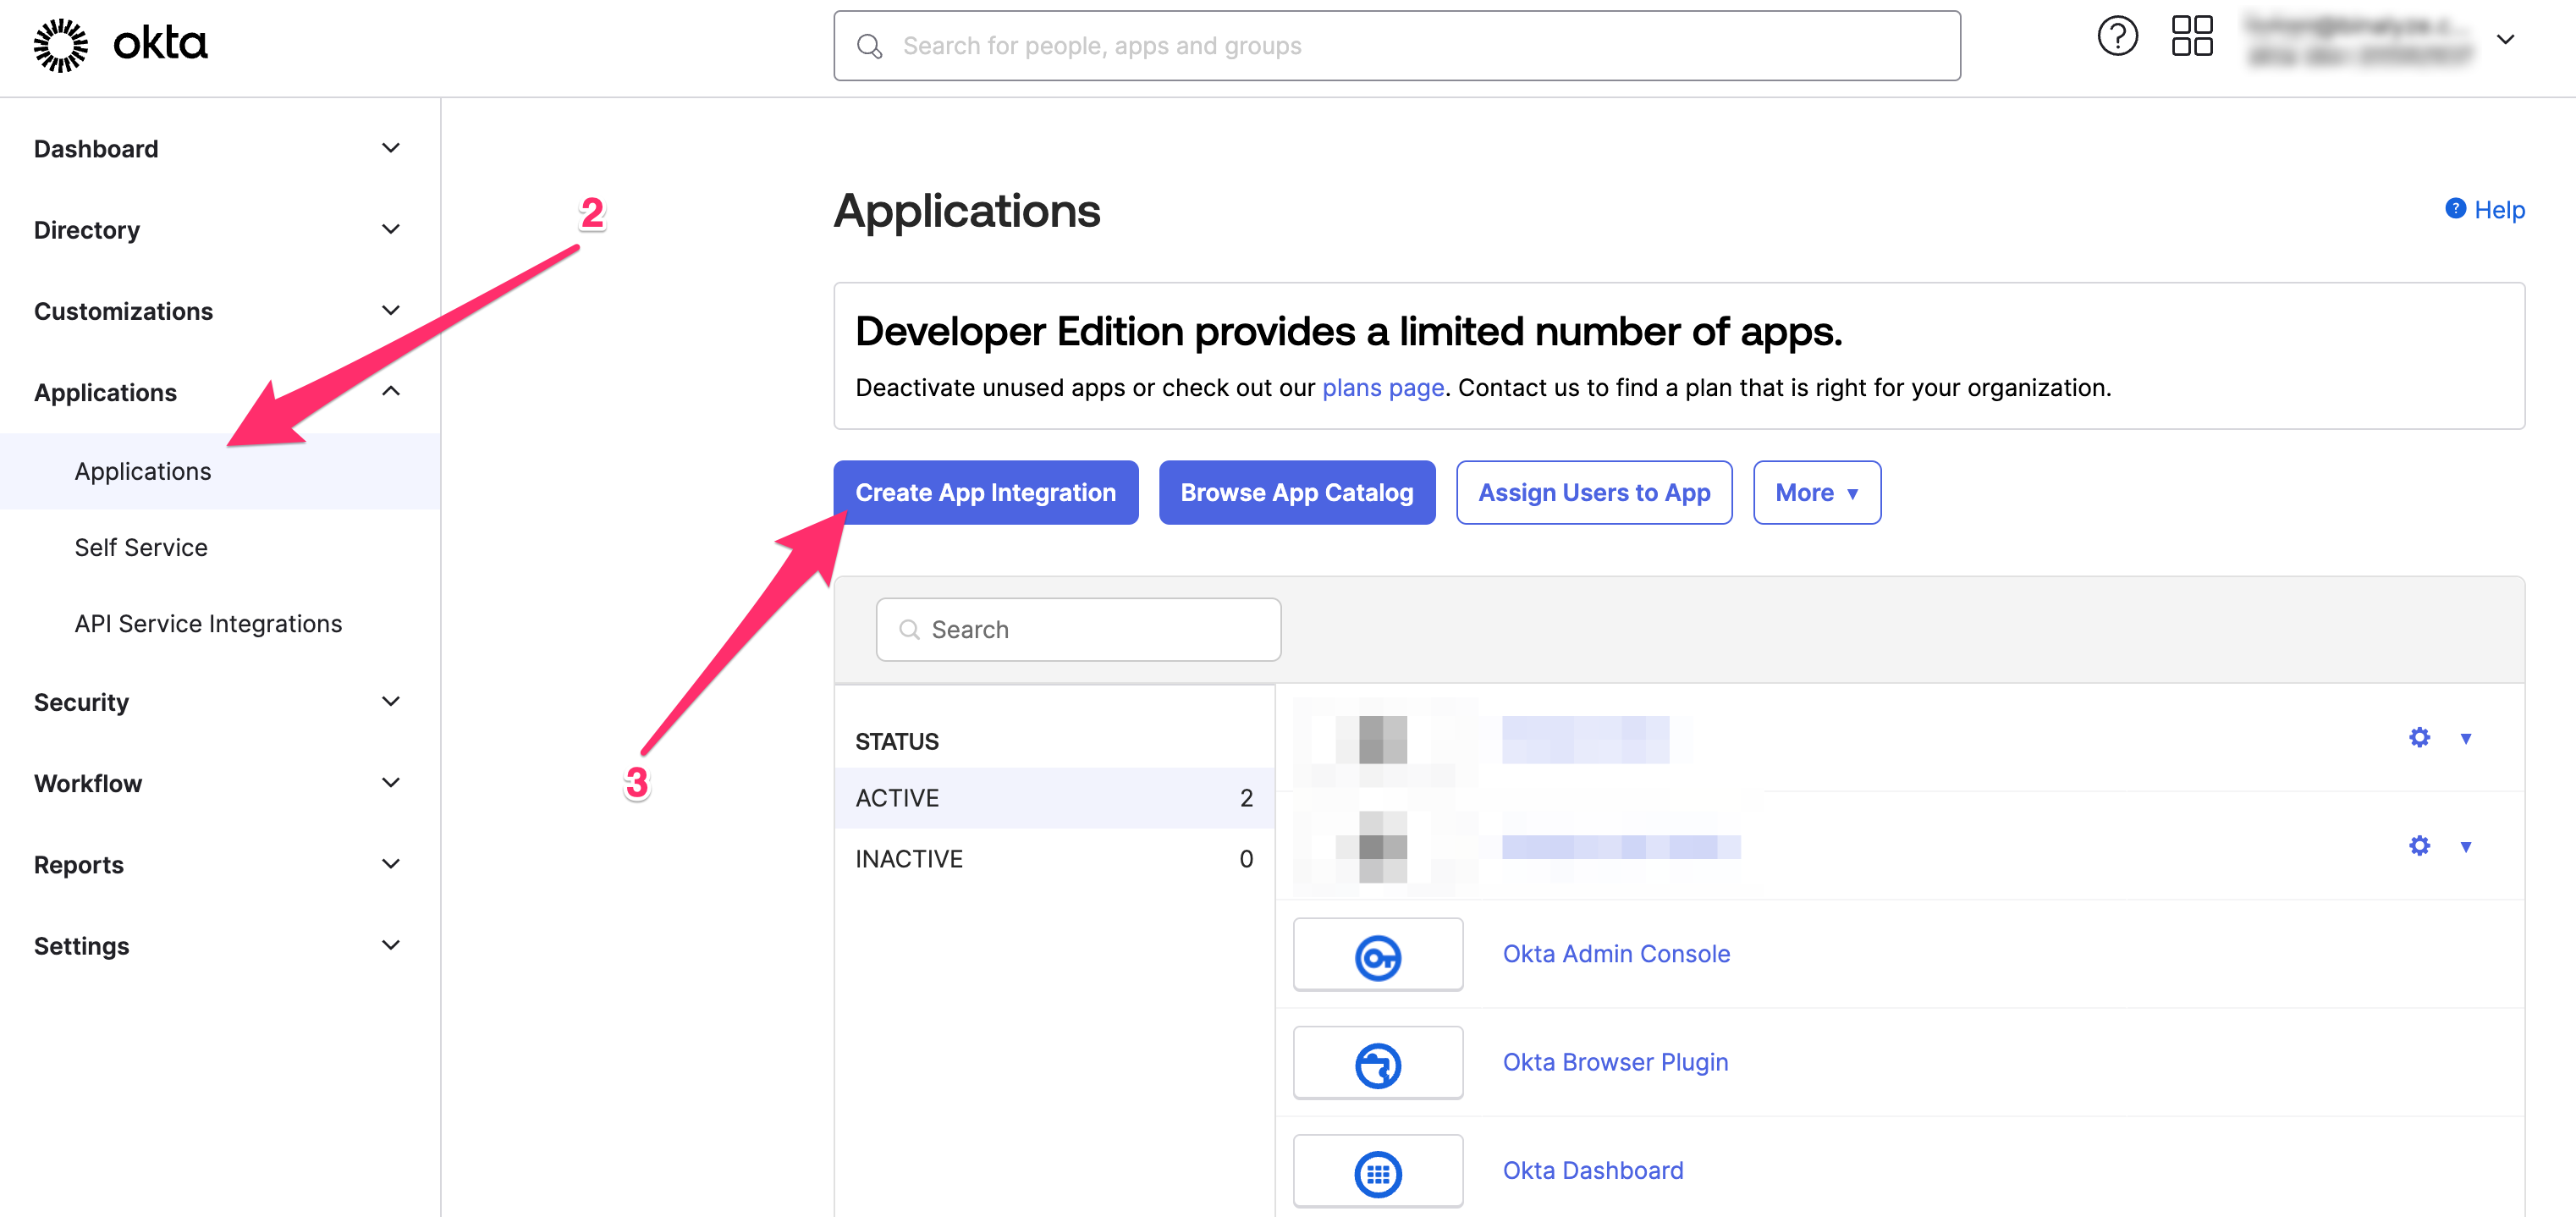
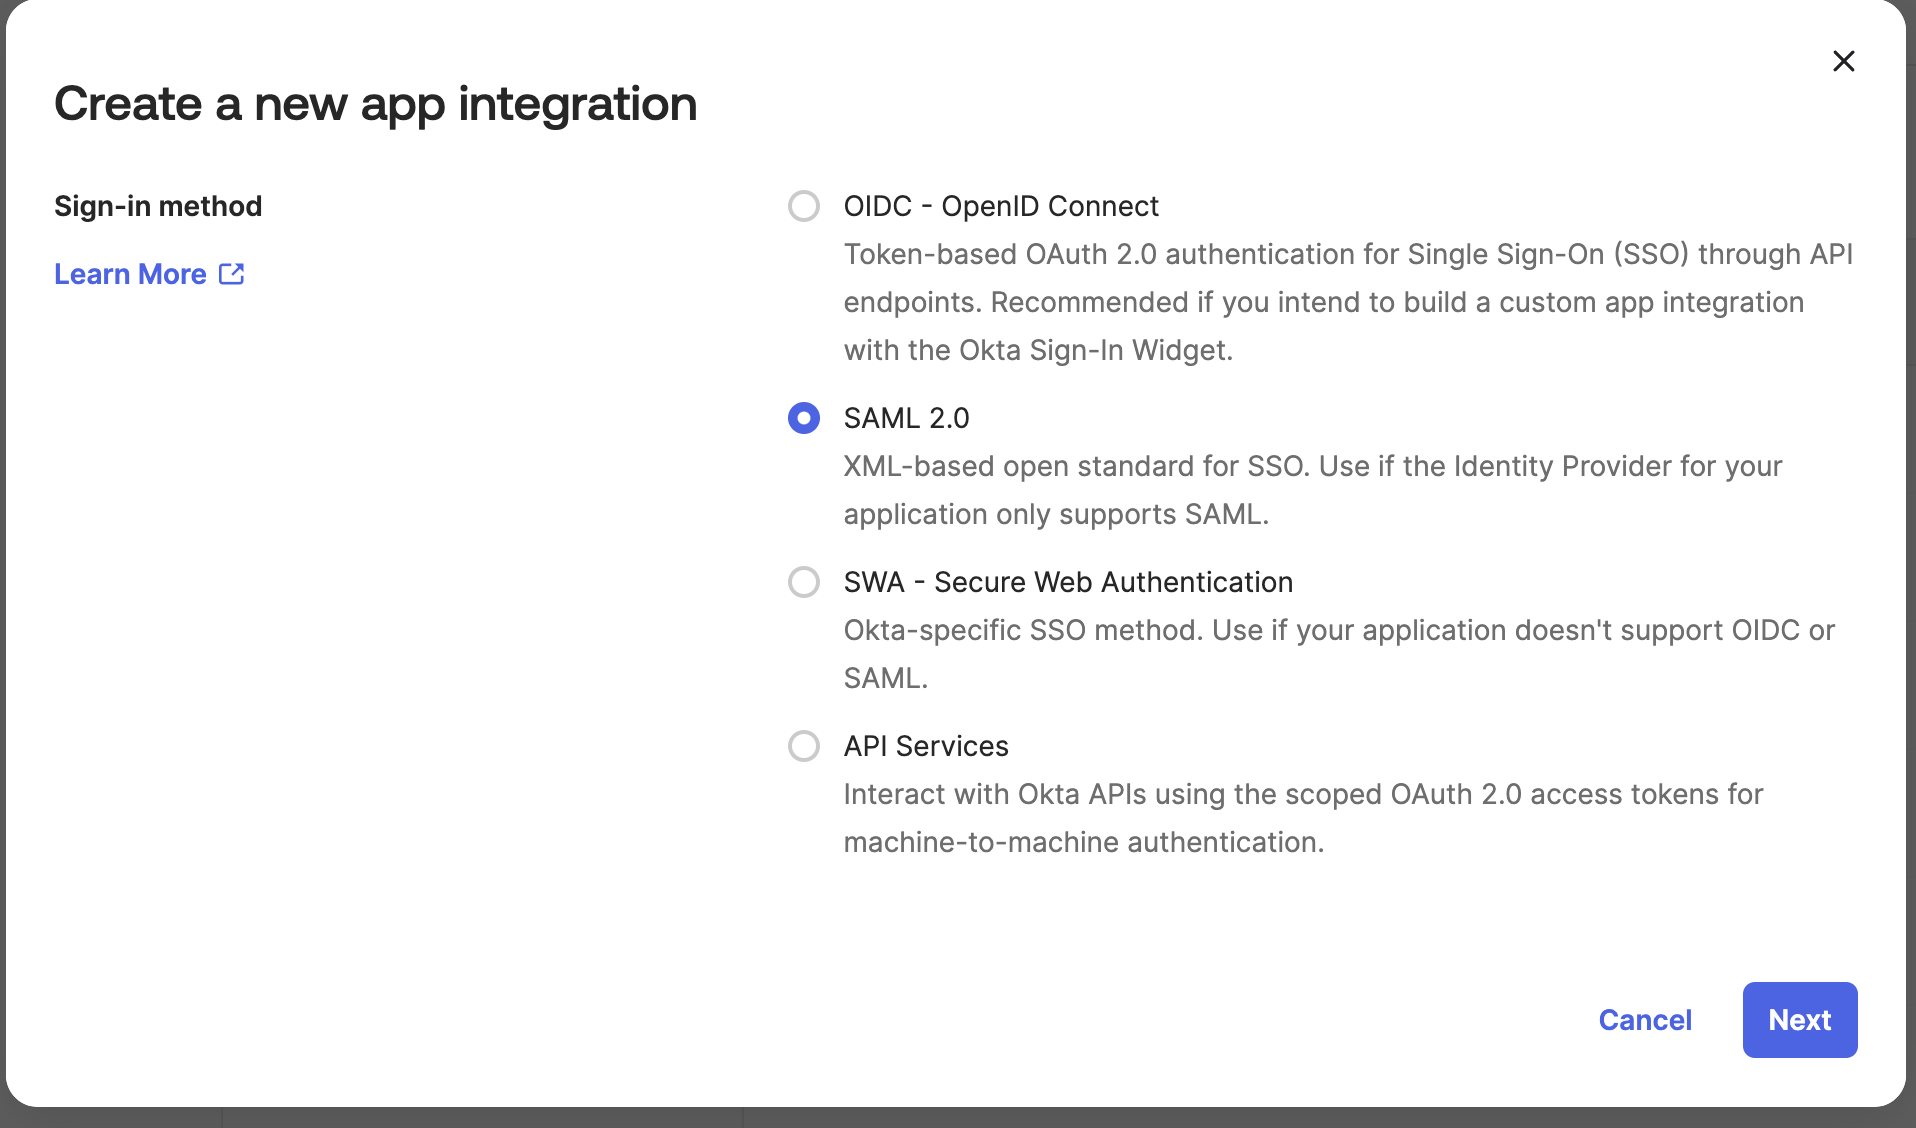
  1. Select SAML 2.0 as a sign-in method and click the “Next“ button

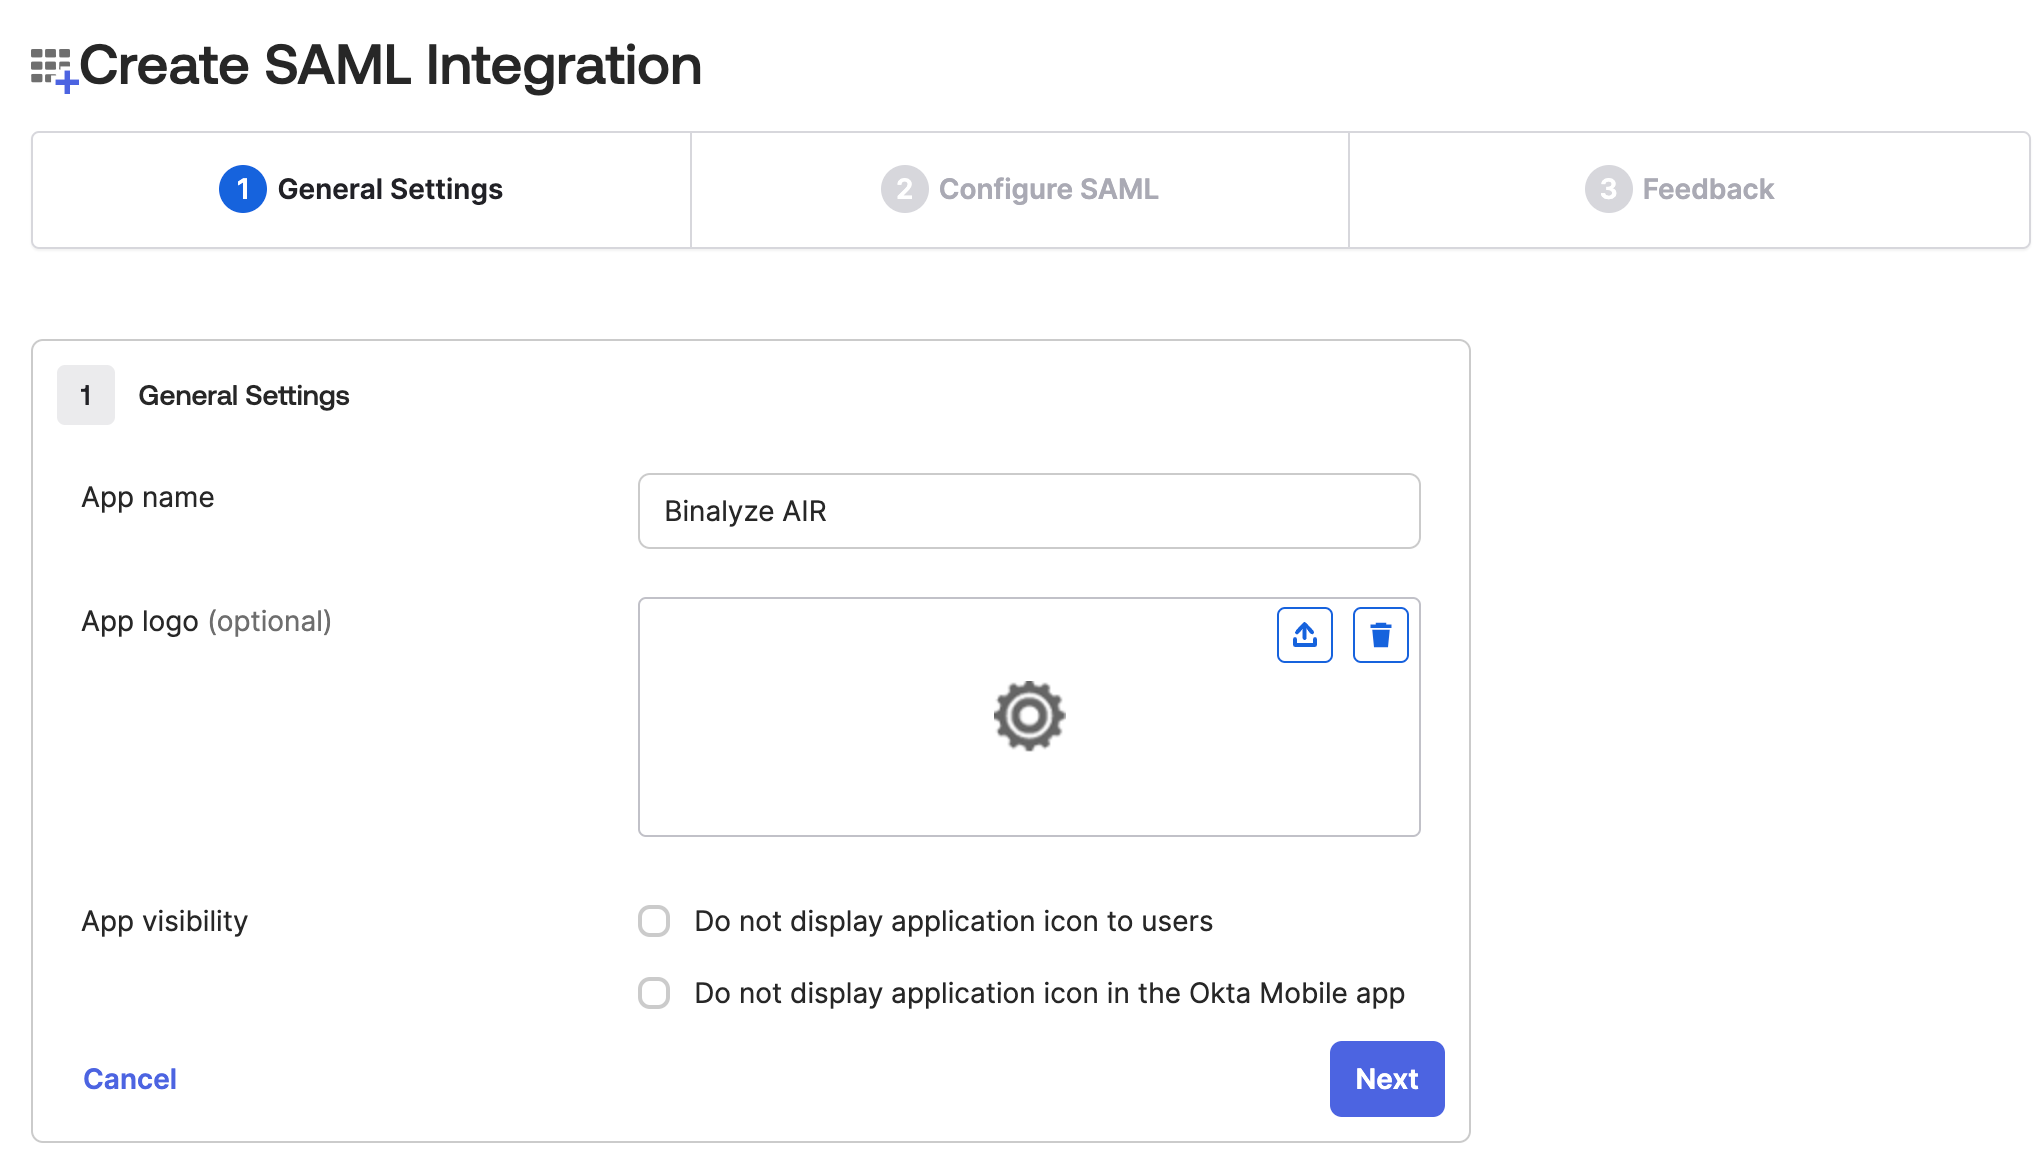
  1. Name your application, and upload a logo (logo is optional), and click the “Next” button

  1. Enter your domain name followed by this callback at the end of the path: /api/auth/sso/okta/callback. For example: <https://<your-domain-name>>/api/auth/sso/okta/callback

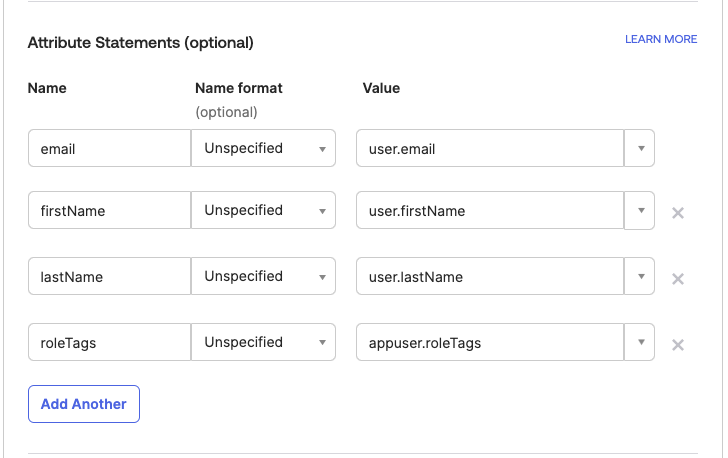
  1. Fill in the Attribute Statements section as follows:

All fields are case-sensitive. Make sure all of them are filled correctly.

  1. On the next page, click the first option, and then click the “Finish” button.
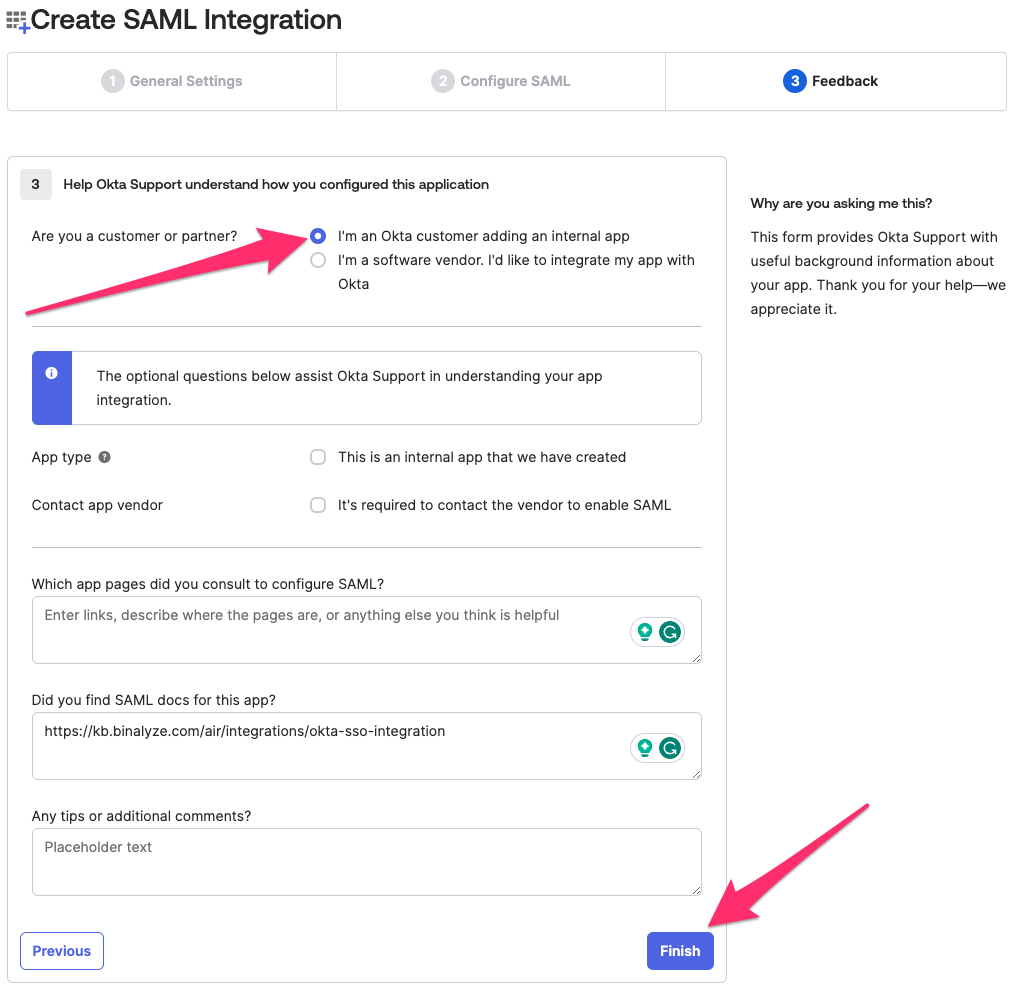
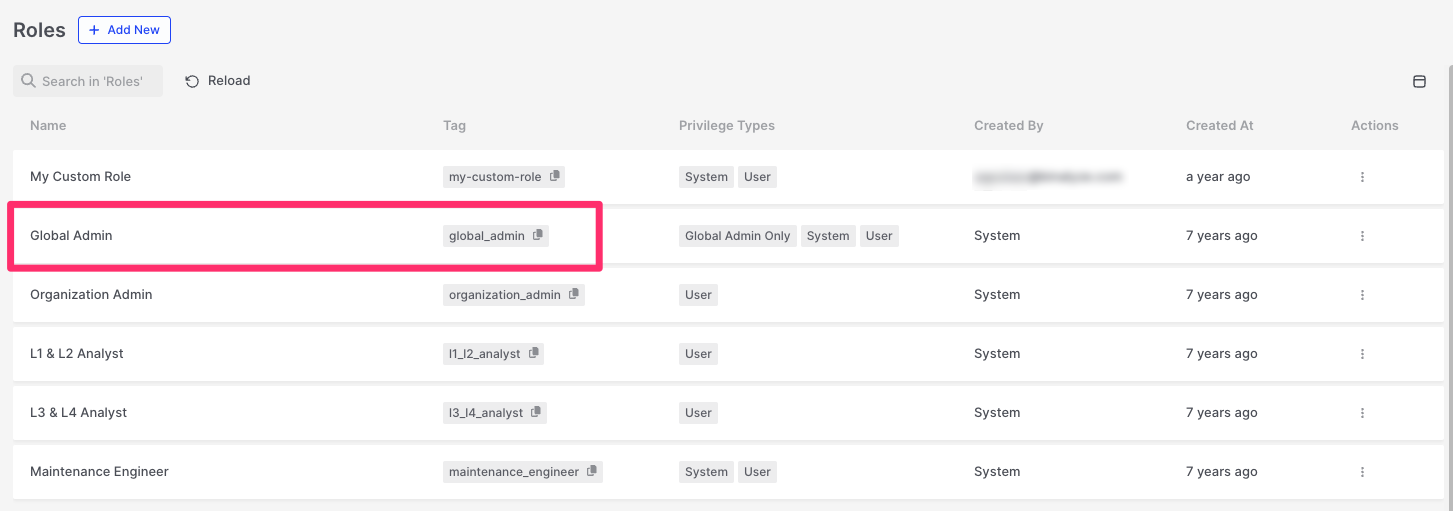
  2. Go to the “Profile Editor” page under the “Directory“ section and click the name of the latest created app.
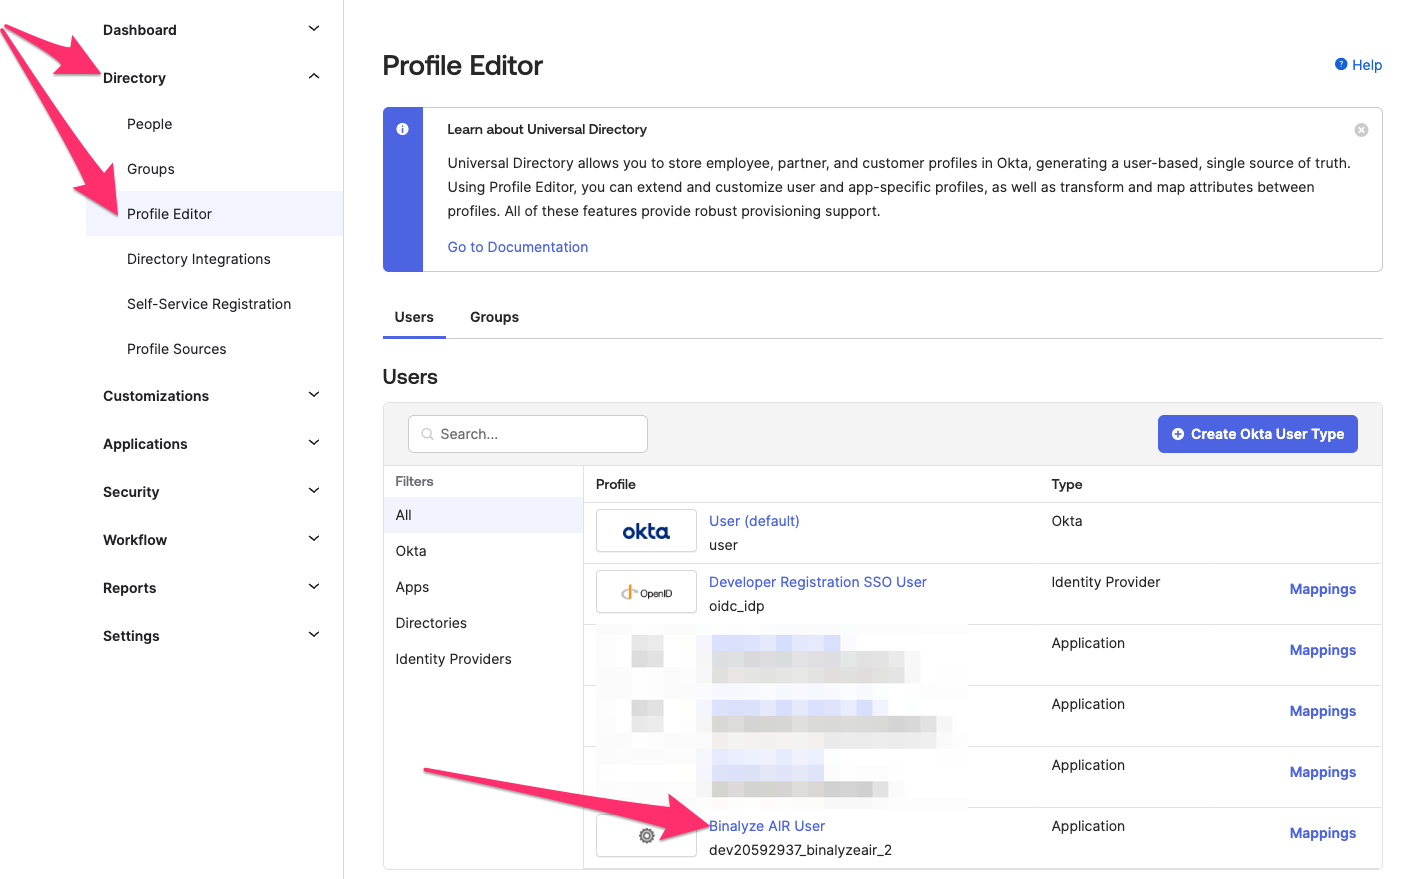
  1. In the “Attributes” section, click the “Add Attribute” button.
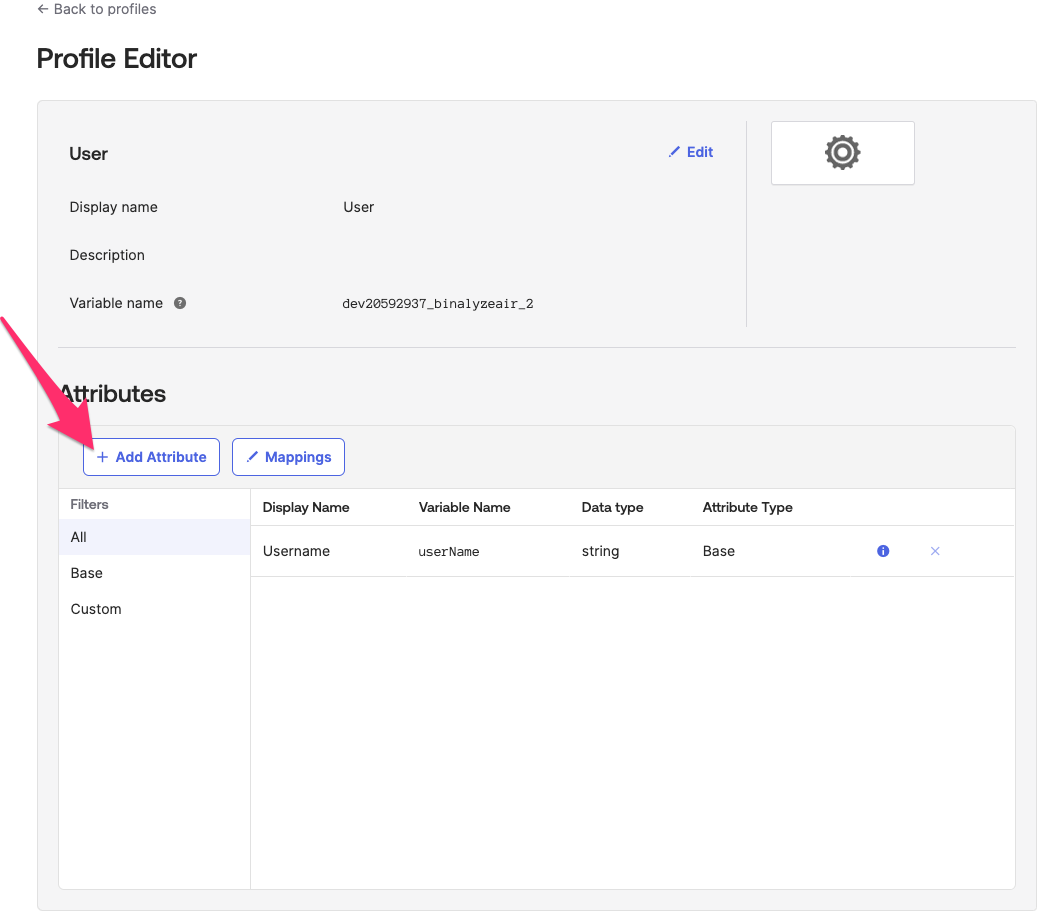
  1. Select “string array“ as the data type.

  2. Enter a name and description for the attribute.

  3. Enter “roleTags“ as the variable name.

  4. Click the “Define enumerated list of values“ checkbox.

  5. Click the “Attribute required“ checkbox.
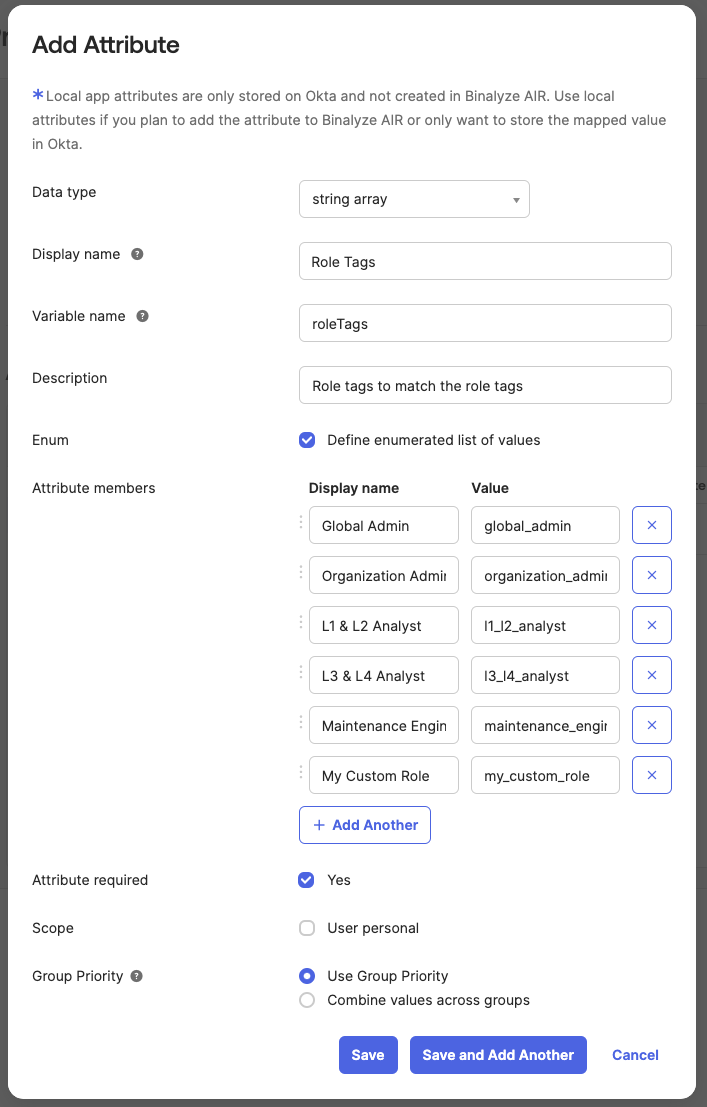
  6. Give a display name of your new role and enter the corresponding “Tag” of the role that you want to map within the Binalyze AIR Console into the “Value” field. For example, the “global_admin”, which is the tag of the Global Admin role in Binalyze AIR Console, is used for the “Value” section.

    Then click save.

  7. Navigate back to the “Applications“ page. Click the name of the app. Then go to the “Assignments” tab.

  8. Click the “Assign to People” button under the “Assign“ dropdown.
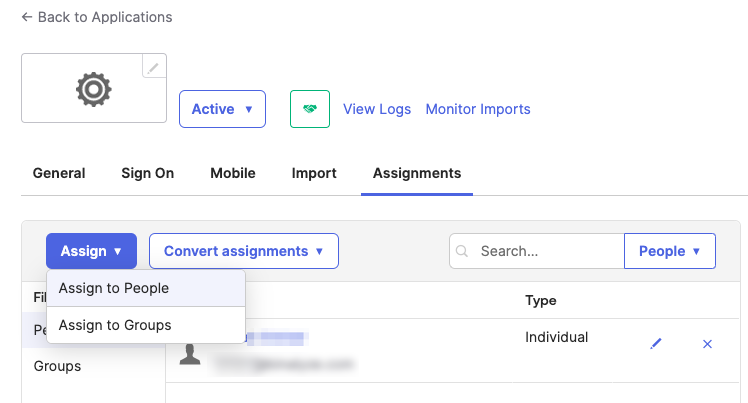
  9. Click the “Assign” button that you want to assign to.
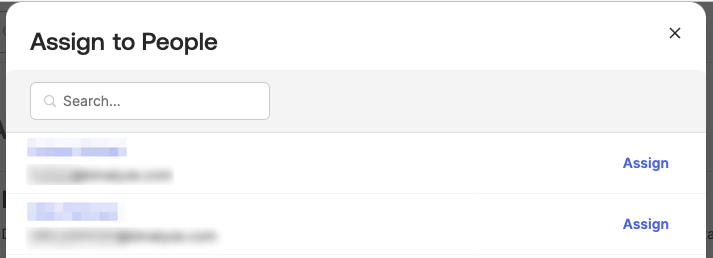
  1. Leave the user name field as is and select the roles of the user. And click the “Save and Go Back“ button.
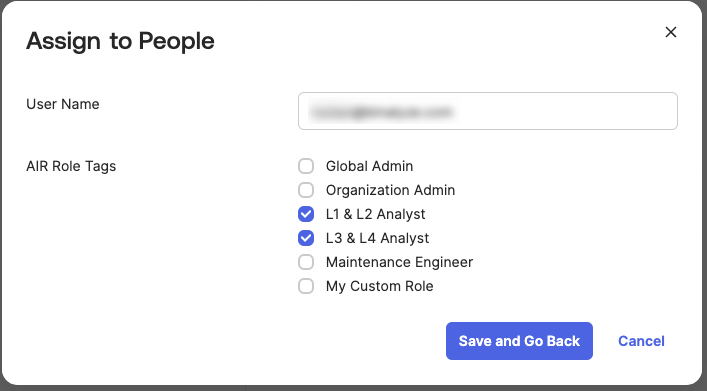
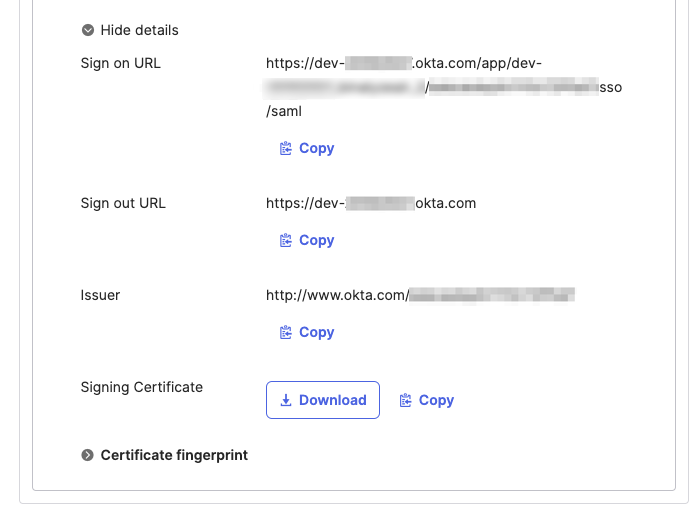
  1. Go to the “Sign On” tab and click “More Details“
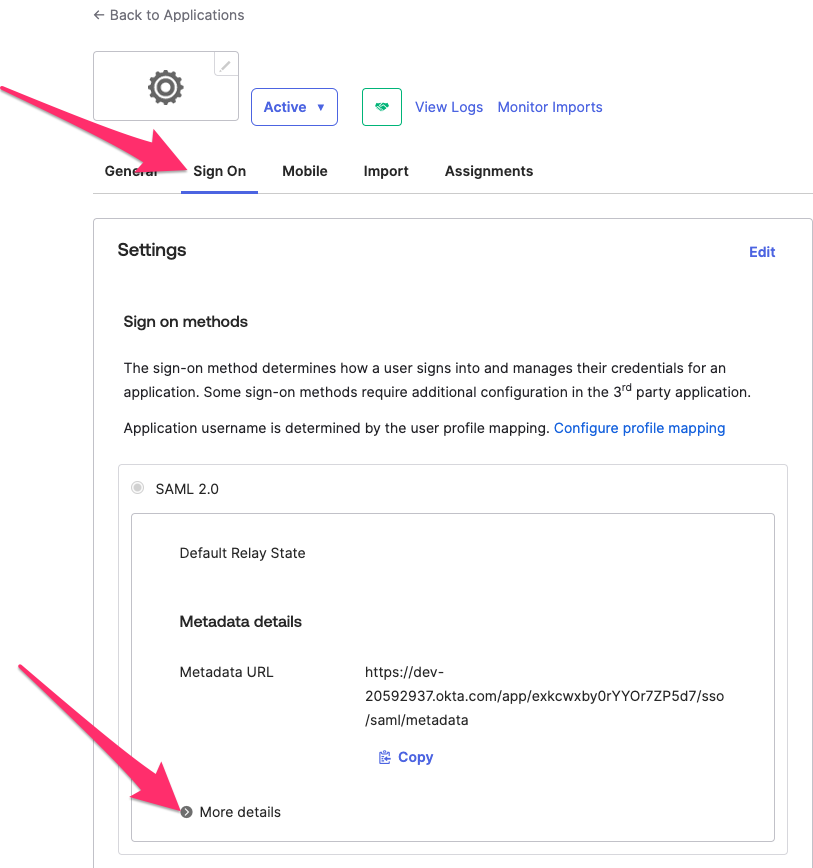
  1. Sign in to the Binalyze AIR Console.

  2. Navigate to the “Settings” page, then click the “Security” section.

  3. Enable Okta by clicking the switch button.
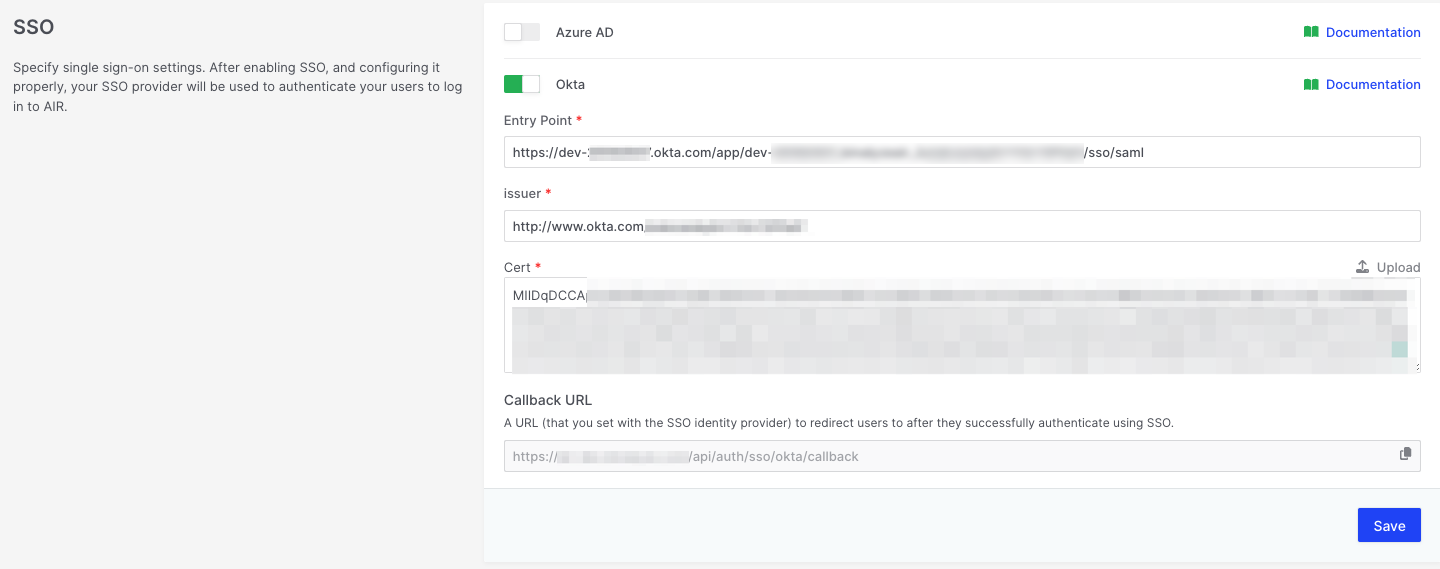
  4. Fill in the required fields according to the Sign on tab in the Okta

Entry Point: Okta Sign on Url

Issuer: Okta Issuer

Cert: Okta Signing Certificate

  1. Click Save settings

  2. The “Sign in with OKTA” button should appear on the Binalyze AIR Console login page. Once you click this button, you will navigate to the Okta login page to authenticate your access. Once you are authenticated, you will be redirected back to the AIR console.

After configuring Single Sign-On (SSO), it is mandatory to retain at least one local user account. This is essential because if the SSO URL expires or any configuration changes occur on the SSO provider's side, you will need access to a local account to log into the AIR Console and update the SSO settings.

Maintaining a local user account acts as a safety net, ensuring continued access to critical administrative functions within AIR, even in scenarios where the SSO functionality is temporarily unavailable.

Create App Integration.
Select SAML 2.0.
Create SAML integration
Attribute Statements.
Select the customer option and 'Finish'.
Select the name of the latest created app.
Select the “Add Attribute” button.
Select “Attribute required“ checkbox.
Name and Save the Role/Tag
“Assign to People” button under the “Assign“ dropdown.
Select the “Assign” button required
Select the “Save and Go Back“ button.
Go to “Sign On” tab and select “More Details“
Enable Okta
The AIR console Sign In page